Best Tile Leveling System — Clips vs Wedges vs Spin Caps Compared
Finding the best tile leveling system is one of those decisions that looks simple until you’re three hours into a bathroom floor with lippage problems and a bucket of clips you bought from the wrong brand. I’ve been setting tile for going on eleven years — floors, walls, showers, large-format commercial slabs — and I’ve run every major system type through its paces on real jobs. This isn’t a roundup of spec sheets. This is what actually happens when you crack open a bag of clips on a Monday morning and have a deadline by Thursday.
The core question most people are asking isn’t just “which system exists” — it’s which one makes sense for their specific job, their budget, and their skill level. That answer changes depending on whether you’re a homeowner doing one bathroom or a pro installer running a crew through 4,000 square feet of 24×48 porcelain. Let’s get into it.
Three Types of Tile Leveling Systems — A Quick Overview
There are three main categories you’ll run into when you start shopping. They all solve the same problem — keeping tile edges flush during installation before the thinset cures — but they do it differently and they cost very different amounts per tile.
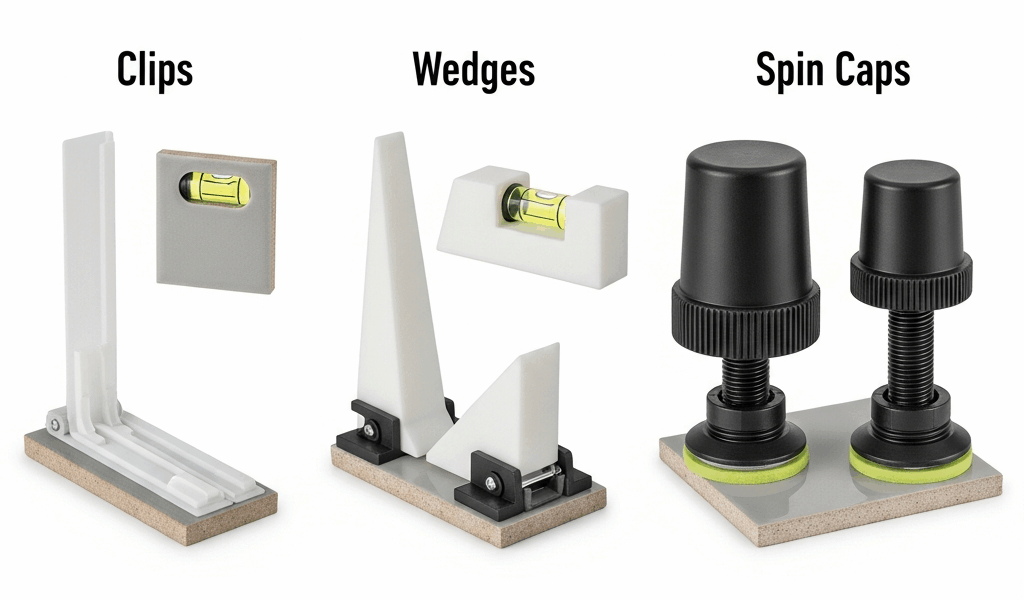
Traditional Clips and Wedges
This is the original system. A plastic clip slides under the edge of the tile, sits in the thinset bed, and a tapered wedge gets driven through the clip’s slot from the top. The wedge applies downward pressure that pulls adjacent tiles into alignment. Once the thinset cures, you kick the clip base off with a rubber mallet and sweep up the broken tabs. Simple. Disposable. Cheap.
Spin Cap Systems
Spin caps use a threaded bolt-style base that stays in the thinset, and a cap that you spin down by hand — or with a drill attachment — to apply even pressure across the tile surface. The Spin Doctor is the most recognized brand in this category. No pliers, no wedge-driving. You just spin. The bases are single-use, but the caps are reusable.
Reusable Strap Systems
The T-Lock system is the main player here. Instead of disposable clips, a rubber strap hooks under the tile and a reusable cap locks down from the top. You pop the cap off after cure and the strap pulls free from below the tile. Higher upfront cost, lower ongoing cost if you’re doing enough volume. Works best on floors, not ideal for walls.
Price per tile, roughly: traditional clips run about $0.06–$0.10 per clip installed; spin cap systems land around $0.20–$0.35 per tile; reusable systems cost $80–$120 for a starter kit but drop close to zero ongoing cost after several uses. These numbers matter. A lot.
Traditional Clips and Wedges — The Affordable Standard
Raimondi and QEP are the two brands I’ve used most. Raimondi’s clips are noticeably more consistent in tab thickness, which matters when you’re pulling wedges — a thin tab breaks too early and your leveling pressure disappears. QEP’s system is widely available at Home Depot and costs less per bag, which is why I see it on a lot of DIY jobs. For a homeowner running 80 square feet of floor tile, that price difference is real money.
Tumbled by a bad experience early in my career, I started setting 12×24 tiles on a bathroom floor using QEP clips and forgot to check my thinset consistency. The wedges were pulling fine but the thinset was too stiff to allow any movement, so half my leveling pressure was wasted. Lesson learned — the system works with your substrate prep, not instead of it.
The workflow with clip and wedge is slower than spin caps. You need either pliers or a specific wedge driver tool to properly seat the wedge without breaking the clip prematurely. Raimondi sells a dedicated plier tool for around $25 that makes a genuine difference. Without it, you’re squeezing by hand and you’ll feel it in your grip by hour two.
Where this system dominates is flat, large-format tile on a well-prepared substrate. 12×24, 18×18, even 24×24 porcelain — the clip-and-wedge handles all of it cleanly. Cost per square foot for a 12×24 layout, using two clips per tile, runs about $0.15–$0.20 in materials. Hard to beat that number for a one-time residential job.
- Best brands — Raimondi (premium), QEP (budget-friendly, widely available)
- Cost — approximately $0.06–$0.10 per clip
- Tools required — wedge pliers ($20–$30) or manual pressure
- Best use case — residential floors, DIY installs, flat substrates, large-format tile
- Weakness — slower than spin cap, pliers required, tabs must be snapped off after cure
One thing people don’t mention enough: the snapping process after cure. You walk the floor with a rubber mallet and crack off every exposed clip tab. It’s satisfying the first time. By room three it’s just noise and a sore wrist. Not a dealbreaker, but worth knowing before you buy 500 clips.
Spin Cap Systems — Fastest to Install
Probably should have opened with this section, honestly, because if you’re a working professional the spin cap conversation is the most important one on this page.
The Spin Doctor system changed how a lot of tile crews operate. You press the threaded base into the thinset at the tile joint, set your tile on top, and spin the cap down until it contacts the tile surface with even pressure. No pliers. No wedge angles to manage. If you’re running a drill with the Spin Doctor bit attachment — it’s a specific hex bit, runs about $12 — you can cap and set tiles faster than any other method I’ve used.
MLT (Montolit Leveling Technology) makes a competing spin system that’s popular in Europe and gaining ground in the U.S. The MLT caps have a slightly wider contact point, which I prefer on softer porcelain where point pressure can occasionally leave a mark in the glaze if the cap is overtightened. It’s a minor thing but worth noting for high-gloss or polished surfaces.
The per-tile cost is higher. Spin Doctor bases run around $0.25–$0.35 each depending on where you buy them, and you’ll use one or two per tile depending on size. On a 500 square foot commercial job, that’s a real budget line. My usual calculation: if labor savings from faster installation offset the material premium, spin caps win. On a job with a tight material budget and flexible time, clips win.
- Best brands — Spin Doctor, MLT
- Cost — approximately $0.25–$0.35 per base unit
- Tools required — optional drill bit ($12), no pliers needed
- Best use case — professional installers, high-volume jobs, large-format tile, jobs where labor cost matters more than material cost
- Weakness — higher per-tile cost, bases are single-use, caps must be tracked and stored between uses
Wall tile is where I’ve had the most success with spin caps. The clip-and-wedge system is workable on walls but the wedge direction gets awkward on vertical surfaces, especially on tiles above shoulder height. Spin caps apply pressure straight down relative to the tile face, which works cleanly on vertical and diagonal layouts.
One real limitation — spin caps need enough joint width to seat the base properly. Minimum is usually around 1/16 inch. If you’re doing a tight grout joint layout, especially anything under 1/16 inch, spin caps physically won’t fit. Clips are thinner and can thread into tighter joints more reliably.
The Verdict — Match the System to the Job
Here’s the framework I actually use when I’m pricing a job and deciding which system to spec.
Small DIY Bathroom — Go Traditional Clips
A homeowner tiling a 60 square foot bathroom floor doesn’t need a spin cap system. Buy a bag of Raimondi 1/16-inch clips, a bag of wedges, and their $25 plier tool. Total material cost for clips runs around $15–$20 for that square footage. It’s slower. It requires a learning curve of maybe 20 minutes. But the money saved is real, and the results on a flat mortar bed are identical to what a spin cap would produce.
Large Commercial Job — Spin Caps Win
A crew setting 2,000 square feet of 24×48 porcelain in a hotel lobby needs to move fast. Labor is the biggest line item. Spin Doctor or MLT bases, a few drill bits, and a system where every installer on the crew can set and level without stopping to manage pliers — that’s how you hit your schedule. The material premium of $0.15–$0.20 per tile more than pays for itself in daily output.
Reusable Systems — The Niche Winner
T-Lock and similar reusable systems make the most sense for a solo professional doing steady residential volume — maybe 5–10 floor jobs a year. The upfront kit cost around $100 is recovered after roughly 400–500 tile installations. After that it’s nearly free. The limitation is that strap systems don’t adapt as cleanly to walls or irregular grout joint widths, so they’re not a universal replacement.
My Actual Recommendation
If I had to pick one system and use it for everything, it would be the Spin Doctor. Not because it’s always the cheapest — it isn’t — but because it’s the most consistent across tile types, surface orientations, and installer experience levels. New helpers on a crew figure it out in ten minutes. Experienced setters can run it fast enough to justify the cost on almost any commercial job. And the lack of pliers means fewer hand cramps by end of day, which sounds minor until you’re on hour nine of a floor install.
That said, I still keep Raimondi clips in my van. They go on every residential floor I bid under 150 square feet and every job where the customer is supplying their own materials and wants to keep costs down. The best tile leveling system isn’t one product. It’s knowing which tool fits which situation — and having the experience to tell the difference before the first tile goes down.
Stay in the loop
Get the latest northwest renovate updates delivered to your inbox.