Why Toilets Rock — and Why It Matters to Fix It Fast
Toilet repair has gotten complicated with all the conflicting advice flying around. Replace the wax ring. Tighten the bolts. Call a plumber. Nobody agrees, and meanwhile your bathroom floor is slowly rotting.
As someone who ignored a rocking toilet for six months in my master bath, I learned everything there is to know about what happens when you don’t act. Water seeped into the subfloor. Grout cracked along the base. By the time I finally dealt with it, the subflooring damage ran $800 to fix. Today, I will share it all with you — so you don’t repeat that particular disaster.
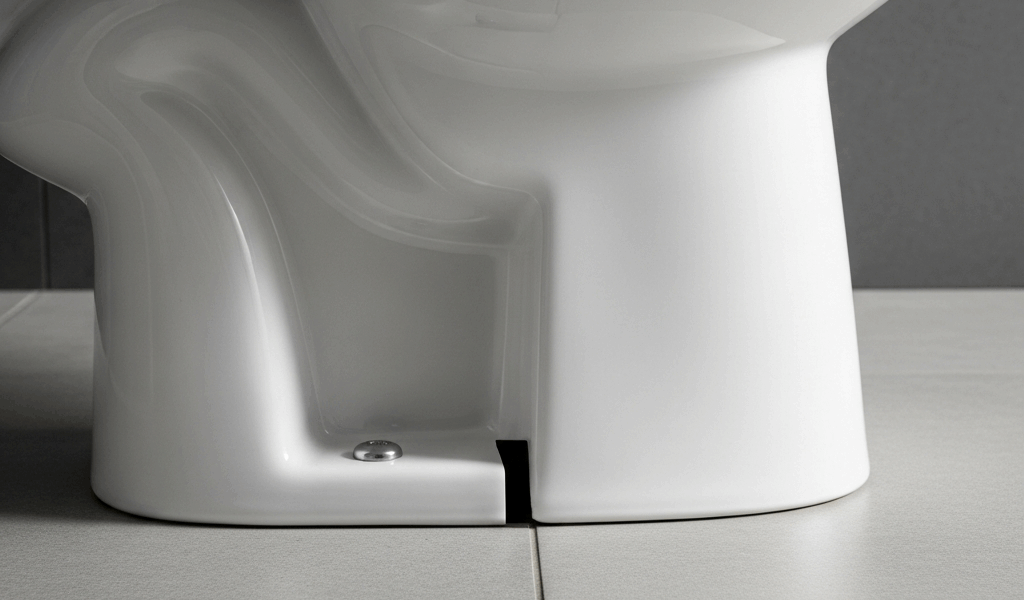
When a toilet rocks, the wax seal underneath fractures. Sewer gas comes up through the gap. Water pools beneath the base and migrates into grout lines, floor joists, and subflooring. The smell gets worse. The repair bill gets bigger. Fast.
But what is a rocking toilet, really? In essence, it’s a toilet that’s lost its stable connection to the floor flange beneath it. But it’s much more than that — it’s an active leak in progress, even if you can’t see water yet.
The fix depends entirely on what’s actually causing the movement. Most articles skip that part entirely. They go straight to “replace the wax ring” without helping you confirm that’s even the problem. You end up buying parts you don’t need and pulling your toilet for nothing. That’s what makes a proper diagnosis so endearing to us DIYers — it saves both money and a wasted Saturday afternoon.
So, without further ado, let’s dive in.
How to Diagnose the Actual Cause Before You Buy Anything
Put the wax ring back on the shelf for now. Before you buy anything — closet bolts, flange extender, wax ring — grab the toilet bowl and actually test it.
Step 1 — Test the Rock Direction
Stand directly in front of the toilet. Grip the bowl near the waterline with both hands. Push forward and back first. Then side to side. Note exactly which way it moves.
- Rocks forward and back only: usually a loose flange or deteriorated wax ring
- Rocks side to side only: almost always loose closet bolts — the cheaper fix
- Rocks equally in all directions: combination issue, or the subfloor beneath the tile has shifted
Write down the direction. Seriously, write it down.
Step 2 — Inspect the Flange and Base
The flange is a ring-shaped fitting where the toilet connects to the drain pipe below. It should sit roughly 1/4 inch above the finished tile surface. After tile installations, it frequently ends up lower than that — and that’s where the problems start.
Grab a flashlight. Look underneath the toilet base. Use a small mirror if the angle is awkward. You’re checking for three things:
- Is the flange sitting flush with the tile, or visibly lower than it?
- Any rust discoloration or hairline cracks in the ceramic base near the bolt holes?
- A dark ring of old wax or moisture staining around the base?
Flange sitting below tile level — that’s your problem, right there.
Step 3 — Check the Closet Bolts
Two bolts anchor the toilet to the flange, one on each side. They usually hide under plastic caps — pry those off with a flathead screwdriver. Takes about four seconds.
Try turning each bolt counterclockwise with an adjustable wrench. If either one rotates more than a quarter turn before hitting resistance, it’s loose. That’s frequently the entire problem. A $2 fix, if you’re lucky.
If both bolts are stripped or frozen, note that too. You’ll need new ones either way.
Step 4 — Feel for Rocking Without Pushing
Get both hands under the toilet rim. Lift just slightly — barely off the tile — and feel for any gap between the base and the floor. Air underneath means the wax ring seal is gone.
Probably should have opened with this section, honestly. It tells you more in five seconds than most diagnostic guides cover in five paragraphs.
Fix 1 — Tightening Loose Closet Bolts the Right Way
Side-to-side rock plus bolts that turned easily? This is your fix. No parts needed.
Pop both plastic caps off at the base — flat screwdriver, gentle pry, they snap right back on later. Using a Craftsman adjustable wrench or a basic socket set, turn each bolt clockwise until you hit firm resistance. Then one more quarter turn. Stop there.
Don’t make my mistake. I over-tightened a toilet bolt in 2019 and cracked the ceramic base clean through. You’re not torquing a lug nut on a truck. You’re snugging a brittle porcelain connection. Firm, not furious.
After tightening both sides, push the bowl forward and back, then side to side. Should feel completely solid. Still rocks? Move to Fix 2.
Snap the caps back on. Done — ten minutes, total.
Fix 2 — Replacing a Worn Wax Ring When the Seal Is Gone
Spongy feeling at the base. Old wax residue visible. Faint sewer smell even after cleaning. The seal is gone, and this is the fix.
While you won’t need a full plumbing toolkit, you will need a handful of specific items:
- New wax ring — standard or with horn, depending on flange depth. Bring your flange measurement to the hardware store. A Fluidmaster 7513 runs about $8 and works for most standard setups.
- Adjustable wrench or 1/2-inch socket set
- Sponge and a five-gallon bucket
- Putty knife or a stiff plastic scraper
- Rubber gloves — non-negotiable
- New closet bolts, $2 to $4 at any hardware store, because the old ones corrode during removal
Step 1: Shut off the supply valve behind the toilet — the oval handle on the wall. Flush once to empty the tank. Sponge out whatever water remains in the bowl and tank. Get it as dry as possible.
Step 2: Disconnect the supply line where it connects to the bottom of the tank. Compression fitting, usually. Thirty seconds with a wrench. Have a towel ready for drips.
Step 3: Remove the bolts at the base. Keep the old ones nearby — sometimes they’re still usable. Usually they’re not.
Step 4: Lift the toilet straight up off the flange. This is the part where a second person helps. The average toilet runs 60 to 120 pounds. Rock it very slightly if it’s stuck, but gently — cracking the bowl here is an expensive mistake.
Step 5: Scrape the old wax ring completely off the flange and the toilet horn. Putty knife, dull scraper, whatever works. Messy, slow, unavoidable. Budget ten minutes. Plug the drain opening with an old rag so sewer gas doesn’t come up while you work.
Step 6: Inspect the flange itself. Looking for chips, cracks, corrosion. If it looks intact, you’re ready. If it’s damaged, jump to Fix 3.
Step 7: Set the new wax ring centered on the flange. Lower the toilet straight down onto it — don’t rock it into position. Straight down, even pressure, let gravity do the seating.
Step 8: Install new closet bolts if the old ones corroded. Hand-tighten only at first, then snug them with the wrench using the quarter-turn method from Fix 1.
Step 9: Reconnect the supply line and open the valve.
Step 10: Let the tank fill completely. Check around the base for any moisture. Wait 20 minutes and check again. Dry floor means a good seal.
Fix 3 — Shimming or Repairing a Low or Damaged Flange
Frustrated by a flange sitting 3/8 inch below the tile surface, most DIYers stack two wax rings and call it done. This new idea sounds logical and fails every single time — the upper ring has no solid surface to compress against, and the seal never forms properly.
The right fix is a flange extender kit. Fernco and Oatey both make solid ones — I’m apparently a Fernco person and their rubber extenders work for me while the generic plastic versions never seat correctly on older cast-iron flanges. Costs $8 to $15 at Home Depot or Lowe’s. Install it directly on the low flange, then set the new wax ring on top of it, then reinstall the toilet following the same steps as Fix 2 above.
First, you should confirm your flange depth measurement before buying — at least if you want to grab the right extender thickness on the first trip to the store.
A flange extender kit might be the best option overall, as a low-flange situation requires a stable base for the wax ring to seal against. That is because wax compresses under weight and pressure — without a solid landing surface at the right height, it simply deforms sideways and the seal never closes.
If the flange itself is cracked, corroded through, or visibly broken — not just low, but actually damaged — that’s a flange replacement job. It involves cutting the old flange loose and fitting a new one into the drain pipe. Call a licensed plumber. Expect $200 to $400. Worth every dollar to avoid cracking a cast-iron drain line.
A rocking toilet is fixable. This new problem took off as a widespread DIY repair topic several years ago and eventually evolved into the step-by-step process enthusiasts know and trust today. Diagnose the direction. Identify the cause. Then act on the right fix — not just the most common one.

Stay in the loop
Get the latest northwest renovate updates delivered to your inbox.