“`html
Why Hardwood Floors Buckle After Water Damage
Hardwood floor buckling after water damage repair is something I spent three months dealing with in my 1987 Ballard bungalow, and it fundamentally changed how I understand wood as a material. The issue isn’t actually the water itself—it’s what happens after the water evaporates.
Wood is hygroscopic. That means it absorbs and releases moisture from the air around it. When water damage occurs—whether from a burst pipe, roof leak, or flooding—the wood fibers swell as they absorb moisture. The expansion happens fastest in the first 24-48 hours, but the real problem develops over the following weeks.
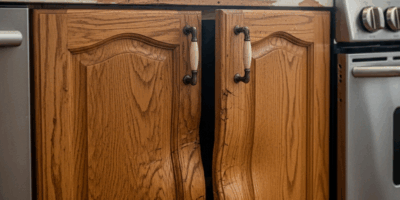
Here’s the distinction that matters: cupping is when the edges of planks rise higher than the center, creating a valley down the middle. CrowningBuckling is more severe: the entire plank lifts and buckles, sometimes separating from the subfloor entirely. Buckling typically means moisture penetrated deeper and stayed longer than cupping or crowning.
The Pacific Northwest climate makes this worse. Our average humidity hovers around 65-75% year-round, especially October through March. When you add water damage on top of that baseline moisture, the wood never fully dries. I learned this the hard way when my kitchen flooded in January—the ambient humidity was already at 70%. Even with fans running constantly, it took nearly six weeks for the moisture content to stabilize.
Timeline matters enormously. In the first 24 hours, visible swelling occurs. By 48-72 hours, if the subfloor is still wet, damage extends beyond the surface layer. After one week of elevated moisture, you’re looking at potential permanent damage to the wood structure itself and potential mold growth in the subfloor.
Assess Moisture Level Before Taking Action
Probably should have opened with this section, honestly. Most homeowners skip moisture assessment entirely and jump straight to sanding. That’s backwards.
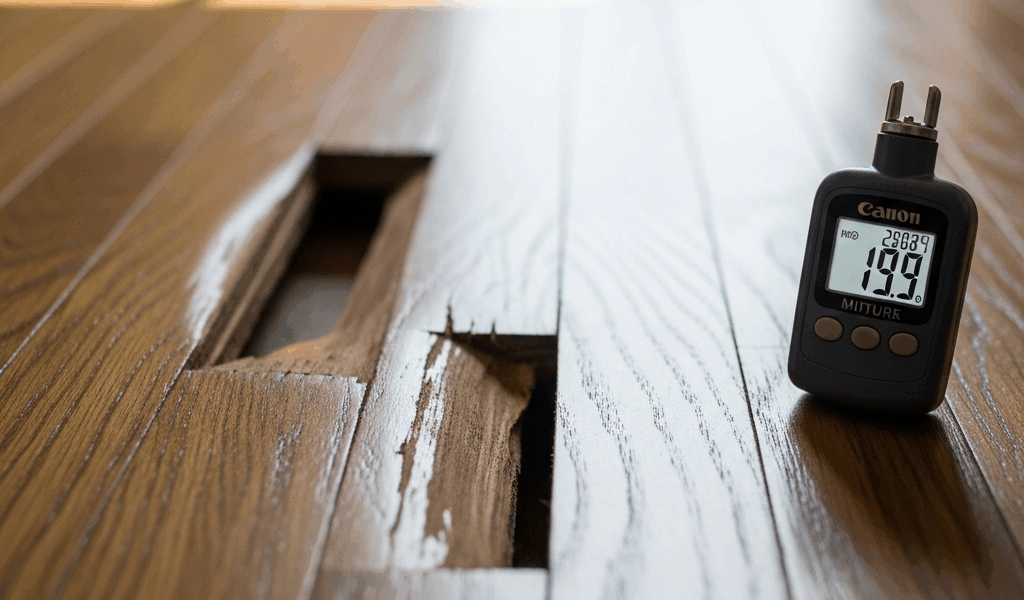
A moisture meter is non-negotiable. You need a pin-type meter, not the cheaper pinless models—I used a Wagner Meters Orion, which costs around $200-280. Less expensive models like the Extech MO55 ($80-120) work fine too. The key is accuracy within a 0.5% margin.
Here’s the step-by-step process I follow now:
- Wait 24-72 hours after visible water has been removed. Active standing water must be gone first.
- Measure moisture content at multiple points across the floor, not just one spot. Test near baseboards, in the center of rooms, and under any area that was directly flooded.
- Take readings at two depths: the surface (1/4 inch) and deeper into the plank (up to 3/4 inch). Insert pins at a 45-degree angle.
- Record all readings. Acceptable moisture content for hardwood is 6-9%, depending on your local climate and the species of wood.
- If readings are above 12%, the wood is still actively drying. Above 15%, you likely have a drying problem that fans alone won’t solve.
Visual inspection checklist while you’re measuring:
- Are planks still visibly swollen or raised at the edges?
- Do you see any soft spots when you press firmly on the wood?
- Is there visible mold or discoloration on the subfloor (visible through gaps)?
- Are there any musty odors coming from beneath the floor?
- Has the subfloor (the layer beneath the hardwood) absorbed water?
The 24-72 hour wait isn’t arbitrary. Wood dries from the outside in. If you sand or refinish too early, you’re sealing moisture inside the plank. That moisture will continue migrating and causing problems underneath the new finish.
Regarding humidity, running a dehumidifier in the affected room while the floor dries is essential. Crack windows if outdoor humidity is lower than indoor humidity—in the PNW, this is almost never the case during winter, so sealed-room dehumidification is your better bet. I ran two commercial dehumidifiers for eight days straight in my kitchen and brought the ambient humidity from 78% down to 62%.
When to Sand and Refinish vs. Replace Planks
This is where the decision gets expensive and consequential.
Sand and refinish if: Moisture readings are 9-12%, cupping or light crowning is visible but minimal (less than 1/8 inch height difference), the subfloor is dry, and buckling has not occurred. Sanding removes the swollen surface layer and allows even moisture distribution—cost runs $8-15 per square foot for a professional job, or $3-5 per square foot if you rent a floor sander and do it yourself (though I’d hire someone).
Replace planks if: Moisture readings remain above 12% after 72 hours, severe buckling has occurred (planks lifting 1/4 inch or more), the subfloor shows water damage or soft spots, or mold is present. Individual plank replacement costs $500-2,000 per room depending on wood species and floor size. I had to replace 40 square feet of hickory in my kitchen, which cost $1,200 total with labor.
The decision matrix also depends on subfloor inspection. Lift a few floor boards in the damaged area if you can without destroying them. If the subfloor (plywood or oriented strand board) is soggy, soft, or discolored, replacement is mandatory—you cannot save hardwood flooring over a compromised subfloor. The buckling will recur within months. Subfloor replacement runs $6-12 per square foot.
Check for vapor barriers too. A missing or damaged vapor barrier allows ground moisture to migrate upward continuously. If your home was built before 1980 (like mine), there may be no vapor barrier at all—this is a PNW problem. Installing a new vapor barrier during water damage repairs costs $1-3 per square foot and prevents future buckling.
How to Prevent Buckling After Repairs
Prevention isn’t glamorous, but it’s cheaper than dealing with buckling twice.
Humidity control is first priority. Target 35-55% relative humidity indoors year-round. In the PNW, this requires active dehumidification October through May. A standalone dehumidifier (5,000-7,000 BTU for a 1,500 square foot home) costs $400-800 and should run continuously during damp months. Alternatively, whole-home dehumidification systems integrate with your HVAC and cost $2,500-5,000 installed.
Ventilation matters. Running exhaust fans in bathrooms and kitchens while you shower or cook pulls moisture out of the house directly. Leave fans running for 20 minutes after showers or cooking is done—I now run mine for 30 minutes and it’s made a measurable difference in ambient humidity.
Seal the floor properly. Water-based or oil-based polyurethane finishes (3-4 coats) create a moisture barrier on top, but they’re not waterproof. Matte finishes (not glossy) are actually more forgiving on dust and show fewer footprints. Plan on resealing every 3-5 years in a high-traffic area or a moisture-prone home.
Under-floor ventilation in crawl spaces or basements is critical. Make sure vents are clear of debris and functioning. If you have a dirt crawl space, lay 6-mil polyethylene sheeting to block ground moisture—this single step reduces subfloor moisture by 20-30%.
Seasonal considerations for the PNW matter more than most people realize. Close windows tightly from October through April. Open windows and run ceiling fans in June through September when outdoor humidity drops below 50%. Don’t leave windows cracked during rainy periods thinking you’ll “air out” the house—you’re just adding humidity.
When to Call a Professional Floor Restoration Company
Some situations demand professional expertise. Red flags include:
- Buckling affects more than 20% of the floor area
- Soft, spongy subfloor (structural compromise)
- Visible mold or mildew odors
- Multiple rooms affected
- Moisture readings above 15% that don’t drop after 72 hours of dehumidification
- Uncertainty about water source or extent of damage
A qualified restoration company will bring commercial-grade dehumidifiers, extract moisture data with professional-grade meters, and assess subfloor integrity. They’ll also coordinate with your insurance company, which matters if the damage qualifies for coverage.
Local Seattle/Tacoma area restoration companies charge $500-1,500 for a comprehensive assessment and drying plan. It sounds expensive until you’re replacing $8,000 worth of flooring because the damage wasn’t properly evaluated.
Set realistic expectations. If the hardwood has been exposed to moisture for more than two weeks before repairs begin, the wood fibers have permanently altered. Sanding and refinishing will improve appearance, but slight cupping or uneven surfaces may persist—this isn’t a cosmetic flaw. It’s the actual geometry of the wood, and no amount of finish will erase it.
My kitchen floor, 18 months post-repair, has minor crowning in one 4-foot section that catches light at certain angles. The hickory planks along the sink are noticeably tighter in grain than they were before water damage. I accepted this as the cost of the event. The floor is stable, dry, and won’t buckle again because I controlled humidity and installed a vapor barrier.
Buckling after water damage repair usually means incomplete drying, inadequate moisture assessment, or subfloor issues during the initial repair. Don’t skip the hard part—the moisture meter readings and the waiting period. Speed feels productive. Patience prevents replacement costs.
“`


Stay in the loop
Get the latest northwest renovate updates delivered to your inbox.