Why Kitchen Islands Fail: The Mistakes Nobody Warns You About
Kitchen island sizing has gotten complicated with all the conflicting design advice and Pinterest inspiration flying around. As someone who’s watched homeowners make the same expensive mistakes over and over, I learned everything there is to know about getting island dimensions, seating, and electrical right. Today, I’ll share it all with you.
You spend $15,000 on a custom kitchen island. The contractor installs it exactly where you specified. Two weeks later, you realize you can’t open the refrigerator door without hitting the island. Bar stools don’t fit under the overhang. You have outlets on one side but need them on the other. The island that was supposed to transform your kitchen into a functional gathering space has become an expensive obstacle.
Kitchen islands are the most requested feature in remodels, yet they’re frequently done wrong. Sizing, seating, and electrical requirements aren’t intuitive—code requirements, ergonomics, and real-world usage patterns determine what works. Get these wrong and your island becomes a $15,000-30,000 mistake you live with for decades.
Here’s how to plan kitchen island dimensions, seating, and electrical properly—so your island actually improves your kitchen instead of creating problems.
Island Size: Why Bigger Isn’t Always Better
Minimum Clearance Requirements (Code and Comfort)
Building codes specify minimum clearances around islands, but these are bare minimums. Real-world comfort requires more space:
Building code minimum: 36 inches clearance on all sides of island
Recommended for single-cook kitchens: 42 inches clearance
Recommended for multi-cook kitchens: 48 inches clearance
Why the difference? At 36 inches, two people can’t pass each other comfortably. One person must stop and wait. Opening dishwasher or refrigerator doors reduces clearance further—you need that extra space for real functionality.
Common Clearance Mistakes
Too close to refrigerator: Refrigerator door swing requires 30-36 inches. If your island is 36 inches from the refrigerator, opening the door leaves zero clearance. You’ll have to walk around the island every time you open the fridge.
Solution: 48-inch minimum clearance from refrigerator to island.
Too close to dishwasher: Open dishwasher creates a 24-inch obstacle jutting into the clearance zone. If island is 36 inches away, loading the dishwasher blocks traffic entirely.
Solution: 45-48 inch clearance between dishwasher and island, or place dishwasher on island itself.
Too close to range: Cooking requires working space. If someone’s at the range and another person is at the island, they’ll constantly be in each other’s way at 36 inches clearance.
Solution: 48 inches minimum for comfortable multi-cook use.
Island Size Proportions
Probably should have led with this section, honestly — islands should be proportional to kitchen size. A massive island in a small kitchen creates cramped pathways. A tiny island in a large kitchen looks awkward and provides little functionality.
General sizing guidelines:
Small kitchen (100-150 sq ft): 4 feet x 2 feet island with 42-inch clearances. Larger may not fit with adequate clearances.
Medium kitchen (150-250 sq ft): 6 feet x 3 feet island with 42-48 inch clearances. This is the most common island size.
Large kitchen (250-400 sq ft): 8 feet x 4 feet island with 48 inch clearances. Can support full seating, appliances, and workspace.
Very large kitchen (400+ sq ft): 10 feet x 4-5 feet island or consider two smaller islands. Single massive island creates excessive travel distance between work zones.
Testing Your Space Before Building
Before construction, mock up your proposed island with cardboard boxes or painter’s tape on the floor. Live with it for a week:
- Can you comfortably cook with someone seated at the island?
- Do cabinet and appliance doors open fully without hitting the island?
- Can two people pass each other in the walkways?
- Does it feel like the island is in the way?
Adjust dimensions based on real usage before finalizing plans. Removing 6 inches from island length or width often solves circulation problems.
Island Height: Standard vs. Multi-Level
Standard Counter Height (36 inches)
Most islands use standard counter height matching the perimeter counters:
Advantages:
- Consistent work surface height
- Better for food prep and cooking tasks
- More flexible—can be used from both sides
- Simpler and less expensive to build
Disadvantages:
- Seating requires counter-height stools (24 inches tall)
- Less privacy for meal prep messes
- Lower height doesn’t hide clutter from living areas
Bar Height (42 inches)
Some islands use bar height for the seating side:
Advantages:
- Seating at comfortable bar-stool height (30 inches)
- Raised section hides prep mess from dining/living areas
- Creates visual separation without walls
Disadvantages:
- Two different countertop levels complicate construction
- Raised section blocks sightlines (problematic if watching kids)
- Less workspace at prep height
- More expensive to build
Multi-Level Islands
Two-tier islands combine 36-inch work surface on kitchen side with 42-inch counter on living area side:
Best for:
- Open concept kitchens where island separates cooking from living space
- Families who want to hide kitchen mess while entertaining
- Larger islands (7+ feet long) where both levels can be functional sizes
Not recommended for:
- Small islands (under 6 feet) where raised section takes too much prime workspace
- Kitchens where sightlines are important (watching kids while cooking)
- Budget-conscious remodels (adds $1,000-2,000 in construction costs)
Most designers recommend single-height islands for functionality unless there’s specific reason for multi-level.
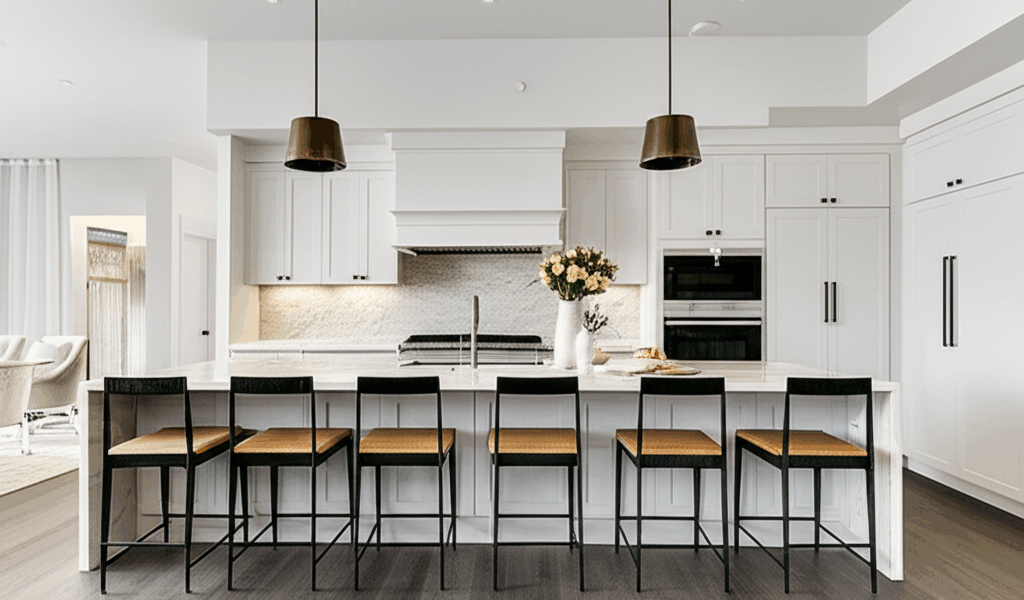
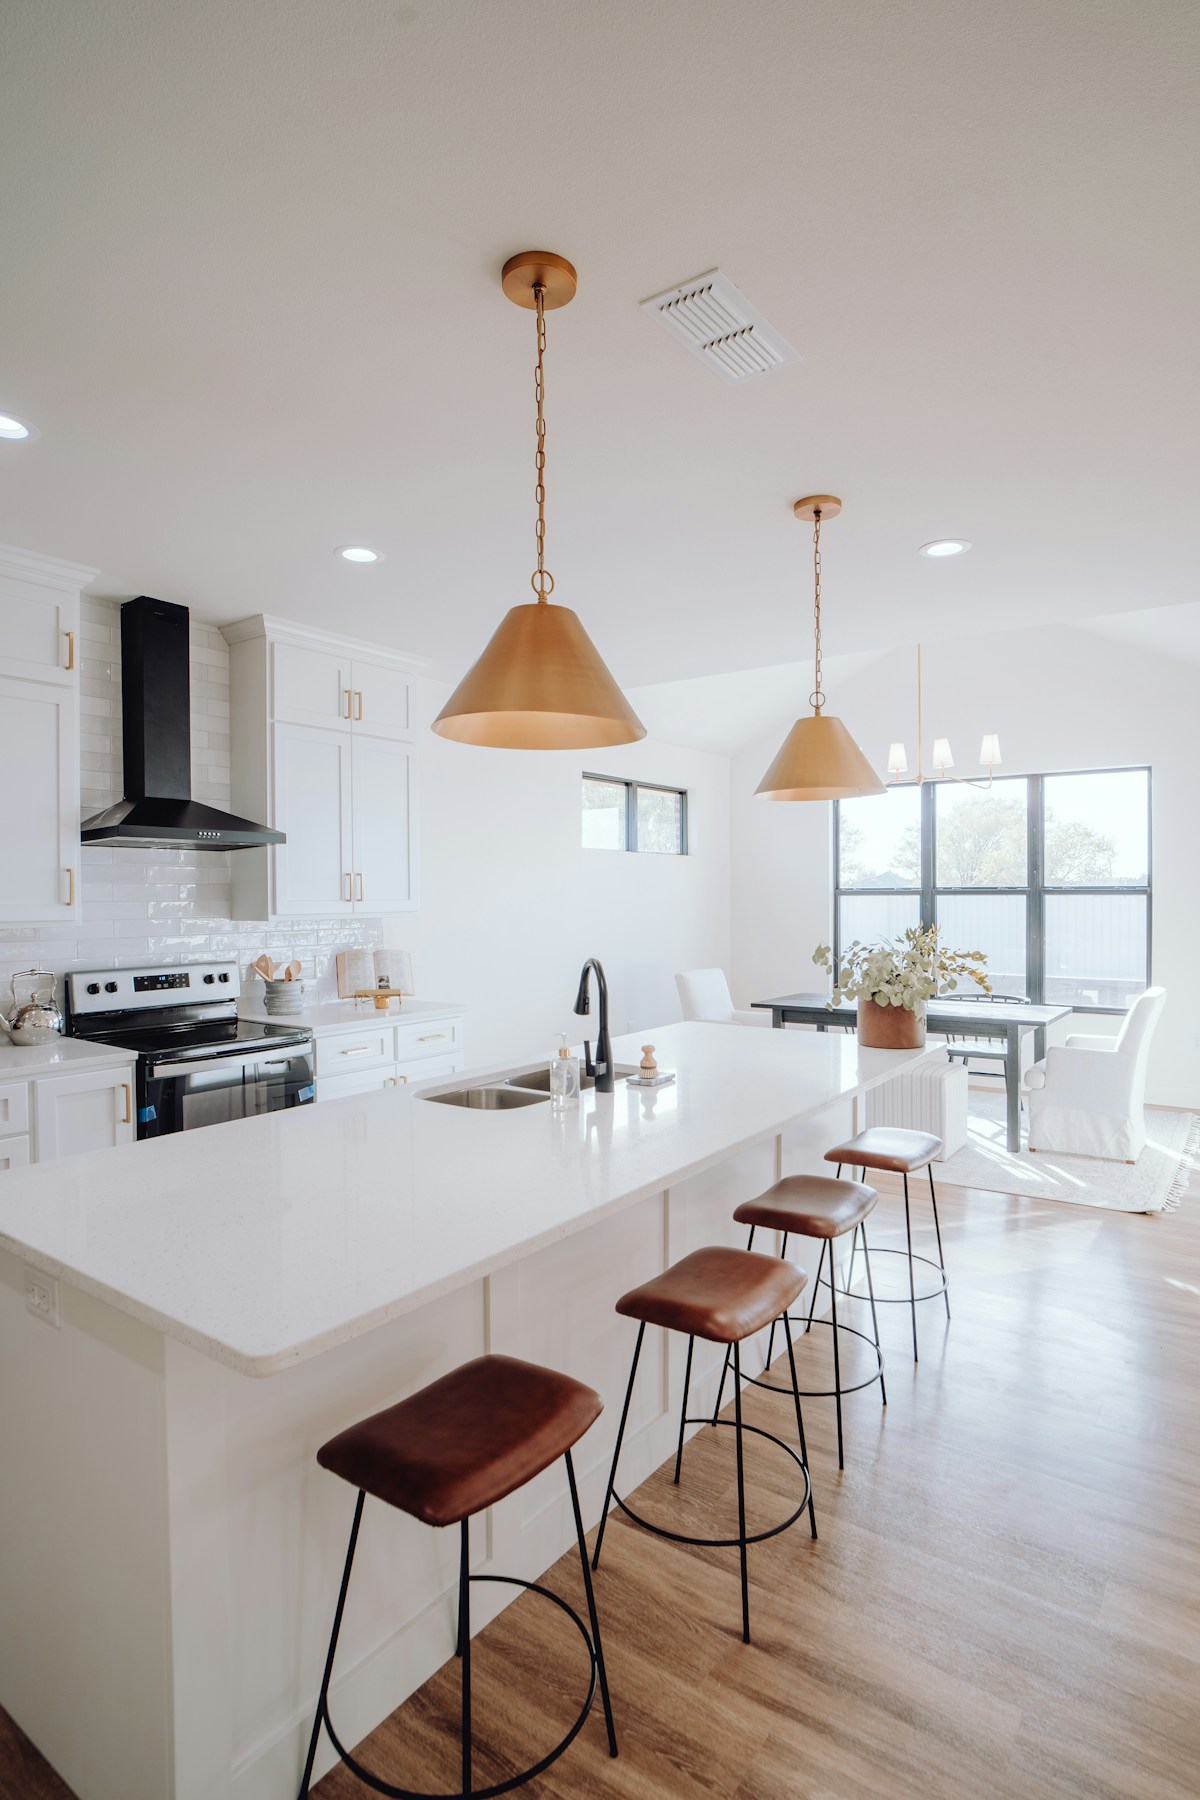
Seating: Getting the Dimensions Right
Overhang Requirements
Seated guests need knee space under the counter. Required overhang depends on counter height:
36-inch counter height: 12-15 inch overhang minimum for comfortable seating
42-inch bar height: 12 inch overhang minimum
Many islands have 12-inch overhangs that feel cramped. Bumping to 15 inches makes seating noticeably more comfortable.
Overhang Support Requirements
Countertops can’t cantilever indefinitely—they need support:
Granite/Quartz: Maximum 10 inches overhang without support. Beyond that requires corbels or posts.
Butcher block/Wood: Maximum 8 inches without support.
Concrete: Maximum 6 inches without support (concrete is heavy).
For 12-15 inch seating overhangs, you need support. Options include:
- Corbels: Decorative brackets under counter. Visible but can be attractive.
- Steel support rods: Hidden inside cabinet, support countertop from below. Cleaner look but more expensive.
- Posts/Legs: Extend to floor. Provides support but reduces knee space if not positioned carefully.
Seating Width Per Person
Allow 24 inches width per person minimum. 26-28 inches is more comfortable.
6-foot island: 2-3 seats maximum (3 will feel tight)
8-foot island: 3-4 seats comfortably
10-foot island: 4-5 seats comfortably
Don’t force too many seats into limited space. Four comfortable seats beat five cramped ones.
Corner Seating Issues
Avoid placing seating at island corners. Corners have no back support and feel awkward. End seating should be at least 12 inches from corner.
Seating vs. Work Surface Balance
Every foot of seating is a foot you can’t use for food prep, landing space for hot pots, or appliances. Most functional islands dedicate 1-2 feet at one end for seating, leaving the remainder as workspace.
Example: 8-foot island
- 3 feet for seating (3 people at 24 inches each)
- 5 feet for workspace, appliances, and clearance
Islands shorter than 6 feet struggle to accommodate both seating and meaningful workspace.
Electrical Requirements: Code and Practical Needs
NEC Code Requirements for Islands
The National Electrical Code (NEC) specifies minimum electrical requirements for kitchen islands:
At least one 20-amp receptacle required on island counter if island is 24 inches x 12 inches or larger with permanent seating or appliances.
Receptacle placement: Must be within 24 inches of seating or workspace edge (measured horizontally).
GFCI protection: All island receptacles require GFCI protection (ground-fault circuit interrupter).
No receptacles in face-up position: Outlets can’t be installed facing straight up on countertop (spill hazard). Must be in sides or pop-up units.
These are minimums. Practical use requires more outlets.
Recommended Outlet Quantities and Placement
6-foot island: 2-3 outlets
8-foot island: 3-4 outlets
10-foot island: 4-5 outlets
Place outlets every 4 feet maximum. This ensures you’re never more than 2 feet from power—the length of most small appliance cords.
Outlet Types for Islands
Standard side-mounted outlets: Most common. Installed on vertical sides of island. Work well but are visible.
Pop-up outlets: Retract into countertop when not in use. More expensive ($100-300 per unit vs. $10 for standard outlet) but cleaner look.
That’s what makes pop-up outlets endearing to homeowners who want clean lines — they disappear when you don’t need them. But they come with tradeoffs:
Advantages of pop-ups:
- Hidden when not in use
- Don’t interfere with seating knees
- Modern, clean aesthetic
Disadvantages of pop-ups:
- Expensive ($100-300 per unit)
- Can trap food/debris when open
- Mechanical parts can fail
- Difficult to add after construction (requires cutting into countertop)
Under-counter outlets: Installed on bottom edge of overhang. Hidden from view but still accessible. Good compromise between standard and pop-up.
Planning for Appliances
If your island includes appliances, plan circuits accordingly:
Cooktop: Requires dedicated 240V circuit (40-50 amps typically). Must be hardwired or use range outlet.
Microwave: Requires dedicated 20-amp circuit.
Dishwasher: Requires dedicated 15-20 amp circuit plus water supply and drain.
Refrigerator/beverage center: Dedicated 15-20 amp circuit recommended.
These dedicated circuits mean substantial electrical work. Factor in $500-1,500 additional electrical costs for island appliances beyond basic outlet installation.
USB Outlets
Consider adding USB charging outlets for phones and tablets. These combo units provide standard outlets plus USB ports. Useful if island serves as homework/laptop station.
Plumbing for Island Sinks and Dishwashers
Drain and Vent Challenges
Islands are floor-mounted, making plumbing more complex than perimeter counters (which can vent through walls).
Drainage: Requires running drain lines under floor to main stack. This involves breaking concrete (slab foundations) or running pipes through joists (raised foundations).
Venting: Islands can’t vent through walls. Options include:
- Island loop vent: Runs up through island cabinetry, loops above countertop, and connects to main vent
- Air admittance valve (AAV): One-way valve that allows air in but not out. Simpler than loop vent but not allowed by all jurisdictions
- Remote vent: Runs horizontally under floor to nearest vent stack (limited distance allowed)
Cost implications: Island sink/dishwasher plumbing typically adds $800-2,000 to installation cost vs. perimeter installation.
Is an Island Sink Worth It?
Advantages:
- Allows cook to face family/guests while washing dishes or prepping food
- Provides second sink for multi-cook kitchens
- Can include garbage disposal for convenient food waste disposal
- Creates distinct prep zone separate from main cleanup sink
Disadvantages:
- Expensive to install ($800-2,000 additional plumbing costs)
- Takes up prime counter workspace
- Water splashes/messes more visible from living areas
- Dishes drying in island sink visible to guests
Recommendation: Island sinks work well in large kitchens (250+ sq ft) with room for both perimeter and island sinks. Skip in smaller kitchens where counter space is precious.
Island Appliances: What Works and What Doesn’t
Cooktop on Island
Requires:
- 240V dedicated circuit
- Downdraft or overhead ventilation (code requirement)
- Minimum 9 inches clearance from seating
- Heat-resistant countertop material
Advantages: Social cooking—face guests while cooking
Disadvantages: Ventilation is challenging (downdrafts are less effective than range hoods), cooking splatters visible from living areas, takes up prime workspace, seating near cooktop gets cooking smells.
Verdict: Only for serious cooks who value social cooking over practical considerations.
Microwave in Island
Mounting options: Drawer-style microwave installs below counter, accessible from above.
Advantages: Saves counter space, keeps microwave out of sight, child-accessible
Disadvantages: Expensive ($1,000-1,500 for drawer microwave vs. $200-400 for countertop), requires bending to access, uses valuable cabinet space
Verdict: Nice luxury feature if budget allows, not essential.
Dishwasher in Island
Requires: Plumbing (water supply, drain, vent), dedicated 15-20 amp circuit
Advantages: Second dishwasher for large families or frequent entertainers, locates dishwasher near seating (easy table clearing)
Disadvantages: Expensive plumbing, uses cabinet storage, open dishwasher blocks island access
Verdict: Useful for large households, unnecessary for most families.
Beverage/Wine Refrigerator
Requires: Dedicated 15-20 amp circuit, ventilation (refrigerators generate heat)
Advantages: Convenient drink access, keeps primary refrigerator less crowded, entertaining feature
Disadvantages: Uses cabinet space, expensive ($500-2,000), noise from compressor
Verdict: Popular luxury feature but entirely optional.
Storage: Maximizing Island Cabinet Space
Standard Base Cabinets
Most islands use standard base cabinets (24 inches deep). This provides storage on one or both sides.
Single-sided access: Use when one side has seating overhang. Storage accessible from kitchen side only.
Double-sided access: Back-to-back cabinets accessible from both sides. More storage but no seating overhang possible.
Drawer vs. Cabinet Storage
Drawers: More ergonomic (no bending to reach back of cabinet), better organization, more expensive.
Cabinets: Traditional, less expensive, accommodate tall items, harder to organize.
Recommended: Mix of both—deep drawers for pots/pans, cabinets with pullout shelves for dry goods, shallow drawers for utensils.
Specialized Storage
Trash/recycling pullouts: Convenient location for food prep waste. Include two compartments (trash + recycling).
Spice pullouts: Narrow (6-inch) pullouts beside cooktop or prep sink for spice storage.
Appliance garages: Pop-up lifts or tambour doors for stand mixer, food processor, etc. Keeps appliances accessible but hidden.
Charging drawer: Dedicated drawer with built-in outlets for charging phones/tablets out of sight.
Lighting Above Islands
Pendant Light Placement
Number of pendants:
- 6-foot island: 2 pendants
- 8-foot island: 2-3 pendants
- 10-foot island: 3-4 pendants
Spacing: 24-30 inches apart, centered over island length
Height above counter: 30-36 inches from counter to bottom of pendant. Lower for intimate feeling, higher for open sightlines.
Sizing: 12-16 inch diameter pendants for standard islands. Larger islands can accommodate 18+ inch pendants.
Alternative Lighting
Linear suspension lights: Single long fixture instead of multiple pendants. Modern aesthetic, easier installation (one electrical box vs. multiple).
Recessed lighting: 4-6 recessed lights over island. Less decorative but more functional for task lighting.
Track lighting: Adjustable fixtures on track. Flexible but less popular aesthetically.
Dimmer Controls
Always install dimmers for island lighting. Full brightness for cooking/homework, dimmed for ambient entertaining lighting.
Material Selection: Countertops and Cabinetry
Matching vs. Contrasting
Match perimeter cabinets: Creates cohesive look, simpler design, less expensive (bulk discount on single cabinet finish)
Contrast with perimeter: Makes island focal point, allows mixing painted/stained cabinetry, more design flexibility
Popular contrast: White perimeter cabinets with dark navy, charcoal, or wood-tone island
Countertop Material Considerations
Quartz: Most popular. Durable, low-maintenance, consistent patterns. $60-150/sq ft installed.
Granite: Natural stone, unique patterns, requires sealing. $50-100/sq ft installed.
Butcher block: Warm, natural, good for baking prep. Requires oiling, can stain/scratch. $40-80/sq ft installed.
Concrete: Industrial modern look, fully customizable, expensive. $100-200/sq ft installed.
Laminate: Budget option, limited durability. $20-40/sq ft installed.
Many kitchens use different countertop material on island vs. perimeter for visual interest (e.g., quartz perimeter with butcher block island).
Budget Reality: What Kitchen Islands Actually Cost
Basic island (stock cabinets, laminate counter, minimal electrical): $2,000-5,000
Mid-range island (semi-custom cabinets, quartz counter, standard electrical/plumbing): $5,000-12,000
High-end island (custom cabinets, premium stone, appliances, extensive electrical): $15,000-30,000+
Cost drivers:
- Appliances (+$2,000-5,000 for cooktop, sink, or dishwasher)
- Custom cabinetry (+50-100% over stock)
- Premium countertop materials (+$2,000-5,000 for high-end stone)
- Complex electrical (multiple circuits, pop-up outlets) (+$1,000-2,000)
- Plumbing for sink/dishwasher (+$800-2,000)
Final Checklist Before Building Your Island
Before finalizing island plans, verify:
- 42-48 inch clearances on all sides (48 inches from refrigerator/dishwasher)
- Island proportional to kitchen size (not dominating space)
- Seating overhang 12-15 inches with proper support
- 24-26 inches per seat minimum
- Outlets every 4 feet maximum, all GFCI protected
- Dedicated circuits for any appliances
- Pendant lights ordered and height planned (30-36 inches above counter)
- Storage planned (mix of drawers and cabinets)
- Ventilation planned if cooktop included
- Plumbing vent solution confirmed with plumber if sink included
- Mock-up tested for one week before construction
Kitchen islands transform kitchens when designed correctly—providing workspace, seating, storage, and defining open-concept spaces. But poor planning creates expensive obstacles that diminish kitchen functionality. Take time to get dimensions, electrical, and seating right. Your kitchen will function better and your investment will add value instead of creating problems you’ll regret for decades.


Stay in the loop
Get the latest northwest renovate updates delivered to your inbox.