“`html
Is It Black Mold or a Mineral Stain
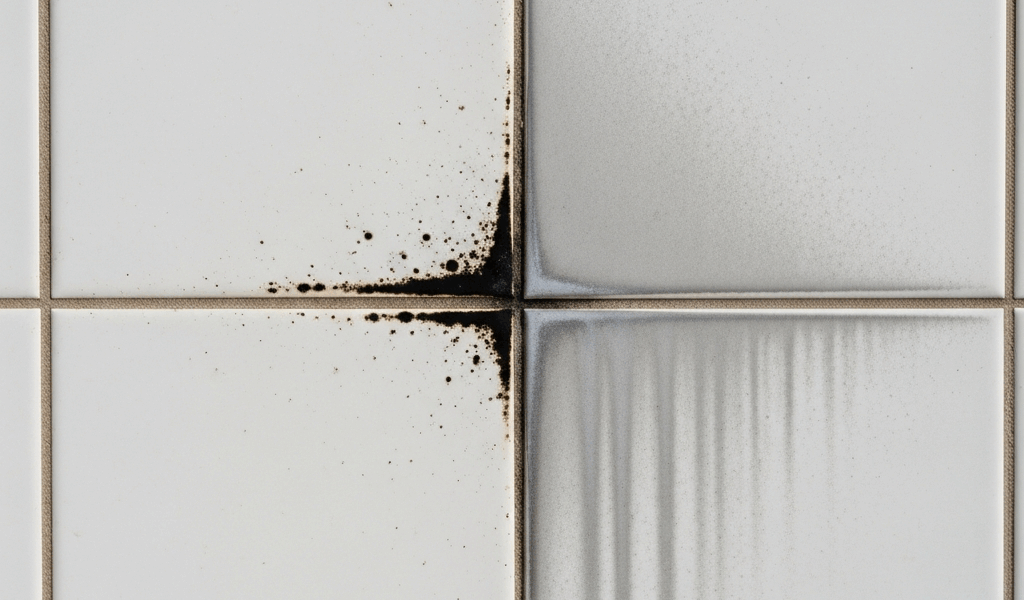
Look, I’m going to be direct here—most people scrubbing at black grout spots have absolutely no idea whether they’re dealing with actual black mold or just mineral deposits left behind by hard water. They grab bleach, they scrub like their life depends on it, and then the stain comes back a week later. That’s when the frustration really sets in.
The reason it keeps coming back? You’ve been treating the wrong problem. Black mold and mineral stains look nearly identical to the untrained eye — that’s the real trap. But they demand completely different removal strategies, and getting this wrong wastes both your time and money.
The Tissue Test
Here’s something that actually works: Press a damp tissue against the spot for about 30 seconds. Mold absorbs moisture and feels spongy or slimy when wet. Mineral stains stay hard and crusty. If your tissue comes away with black residue that feels gritty between your fingers? That’s mineral deposit. If it feels damp and the spot seems to expand slightly when water touches it? You’re looking at mold.
The Smell Test
Lean close and smell. Actual mold has that unmistakable musty, earthy odor — the smell of organic material breaking down. Mineral deposits don’t smell like anything. Nothing at all. If you smell nothing, you’re probably looking at calcium, magnesium, or iron deposits from hard water or soap buildup.
Texture and Appearance
Run your fingernail across the spot lightly — don’t gouge the grout. Mold feels slightly fuzzy or slimy, almost like the surface has a thin layer of growth on it. Mineral stains feel glassy or hard, sometimes with visible crystal formation visible to the naked eye. Mold also tends to spread outward in organic, branching patterns. Stains sit in one spot, usually concentrated exactly where water pools and sits.
So why does this distinction actually matter? Mineral stains are purely cosmetic problems. You remove them for appearance because nobody wants a dingy shower. Black mold is a moisture problem — it means water is sitting in your grout and something is actively growing there. That’s a health concern, especially if anyone in your household has respiratory issues or a compromised immune system. Mold exposure doesn’t just ruin your shower aesthetically; it signals that your bathroom ventilation or grout sealing isn’t doing its job.
Probably should have opened with this section, honestly. I spent two years addressing the wrong problem in my guest bathroom before I realized the black spots kept returning because I wasn’t fixing the underlying moisture issue.
Method 1 — Bleach and Vinegar for Fresh Stains
This method works best on surface-level mold that hasn’t penetrated deep into grout pores. If your tissue test showed soft, spongy growth that’s less than a few weeks old, start here.
Bleach Solution
Mix one part bleach to one part water in a spray bottle — nothing fancy. Cost runs about $3 to $8 for supplies if you’re buying fresh bleach and a basic spray bottle from the drugstore. Open your bathroom door and window wide. Run the exhaust fan on maximum.
Spray the affected grout generously until it’s dripping wet. Let it sit for 10 to 15 minutes — don’t exceed 20 minutes, as prolonged bleach exposure weakens grout structure over time. The bleach will fizz slightly if mold is present. Scrub with a stiff-bristled grout brush using firm, circular motions. Don’t be gentle here; you need actual friction to break up the growth. Rinse thoroughly with clean water. Repeat if spots remain.
Vinegar Alternative
White vinegar works better on mineral stains than mold, but it’s safer if you have respiratory sensitivity. Spray undiluted white vinegar directly on the spot, let it sit for 30 minutes, then scrub with the same brush. Vinegar won’t kill mold as effectively as bleach, but it dissolves mineral deposits and has lower toxicity — your lungs will thank you.
Important Safety Notes
Wear nitrile gloves. Never, and I mean never, mix bleach with ammonia — found in many window cleaners and some bathroom sprays. That combination produces toxic chlorine gas. Ventilate aggressively — if you feel lightheaded, stop immediately and leave the bathroom. Keep the door open during and for 15 minutes after cleaning.
When This Method Fails
If the black spot returns within a week, or if scrubbing barely fazes it, the mold has penetrated deeper than surface level. Commercial mold killers are your next step. Bleach addresses what you can see; it doesn’t reach spores that have migrated into grout cracks and pores deep below the surface.
Method 2 — Commercial Mold Killer for Stubborn Growth
Commercial mold killers contain stronger active ingredients than household bleach sitting under your sink. They penetrate grout more effectively and kill spores, not just the surface growth you can see.
Top Product Recommendations
RMR-86 Instant Mold and Mildew Stain Remover ($12 to $18 per bottle) is my go-to for serious infestations. It’s a liquid concentrate that you spray directly on grout. It works in 15 to 30 minutes and doesn’t require scrubbing on lighter infestations. The smell is chemical but not overwhelming if you ventilate properly.
Mold Armor Stain & Odor Eliminator ($10 to $15) comes as a spray-on foam. It clings to vertical grout lines better than liquid solutions, which matters in shower applications where spray tends to run straight off. This one needs 1 to 2 hours of drying time between applications.
Wet & Forget Outdoor ($20 to $25) is technically marketed for outdoor surfaces, but it works in bathrooms if you have consistent ventilation running constantly. You spray it on and leave it — no scrubbing required. The downside is slower results, anywhere from 7 to 14 days, and the need for sustained air circulation. This one’s better for prevention than active infection.
Application Process
Read the specific product label for mixing instructions first; some are concentrates requiring dilution with water. Ensure the shower is completely dry before application. Spray the product directly onto affected grout lines. Most products require 15 to 30 minutes of dwell time. Some need light scrubbing; others work without it. Rinse thoroughly with water. Most stubborn mold requires 2 to 3 applications at 24-hour intervals.
Cost and Timeline
A single bottle typically treats 100 to 200 linear feet of grout. Most shower applications need one bottle if you’re not dealing with extensive coverage. Cost per application runs $10 to $25. Results appear within 24 to 48 hours if the mold is responsive. Deep, established mold may need 3 to 5 days of treatment before it’s completely gone.
When Professional Intervention Is Needed
If black spots cover more than 10 square feet of grout, or if mold appears on surrounding tile or caulk despite treatment, you have a larger moisture problem. That means your bathroom ventilation is inadequate or your caulk is failing — maybe both. Commercial mold killer buys you time, but you’ll need Method 3 to actually solve the problem.
Method 3 — Professional Sealing After Removal
Grout is porous — that’s the fundamental problem. Even after you kill the mold, moisture can recolonize those pores within weeks if they’re unprotected. Sealing fills those micro-spaces and prevents water from sitting where mold spores can germinate again.
Penetrating vs. Membrane-Forming Sealers
Penetrating sealers like Aqua Mix Sealer’s Choice Gold ($25 to $35 per quart) soak into grout and create a water-resistant barrier from within. You apply them, they dry clear, and they’re invisible to the eye. Membrane-forming sealers like Miracle Sealants 511 Impregnator ($30 to $40 per quart) create a visible protective film on the surface. Penetrating sealers are better for shower grout because they don’t create a slippery surface when wet.
DIY Application vs. Professional Sealing
DIY grout sealers exist and cost $50 to $150 total for a bathroom. You clean the grout thoroughly, apply the sealer with a small brush, and let it cure for 24 to 72 hours depending on the product. The catch: DIY sealers last 1 to 2 years before they degrade and need reapplication.
Professional grout sealing costs $200 to $600 for a standard bathroom, depending on the square footage of tiled surfaces. Professionals use industrial-grade sealers that last 3 to 5 years. They also ensure complete coverage and proper curing conditions, which DIY applications often miss.
Signs Your Grout Needs Regrouting Instead
Sealing only works if the grout itself is intact. If grout is crumbling, has missing sections, or feels soft when you poke it, sealing won’t help. You need regrouting — removing old grout, cleaning the joints, and installing new grout. That’s a $15 to $30 per square foot project and typically requires professional work. If you see daylight through grout lines or water pooling in low spots, regrouting is your actual solution, not sealing.
Prevent Black Mold From Returning
Killing mold is temporary. Prevention requires managing the moisture that allows it to grow in the first place.
Exhaust Fan Sizing and Runtime
Your bathroom exhaust fan needs sufficient CFM — cubic feet per minute — to move humid air out of the space. Standard sizing is 1 CFM per square foot of bathroom. A typical 40-square-foot bathroom needs a 40 CFM fan minimum. Many existing fans are undersized — honestly, most are. If your bathroom is larger than 50 square feet, or if it doesn’t have a window, you need at least an 80 CFM fan.
Run the fan for 20 to 30 minutes after every shower — not just during the shower. That’s when moisture needs to be extracted. If you forget, mold has the environment it needs. Setting a timer or installing a humidity-sensing fan that runs automatically until moisture drops below 50% removes the guesswork.
Humidity Targets
Indoor humidity should stay below 50% for mold prevention. Below 60% is acceptable but not ideal. If you notice condensation on bathroom mirrors 10 minutes after a shower, your ventilation is insufficient. A $20 hygrometer from any hardware store shows you exactly what you’re working with.
Caulk Maintenance
Caulk around the bathtub and shower pan fails faster than grout — that’s just physics. It lasts 1 to 2 years before it cracks and allows water behind the tile. Replace it every 18 months as preventive maintenance. Use 100% silicone caulk, not acrylic. Products like GE Silicone II ($6 to $10 per tube) last longer than cheaper alternatives and resist mold better because they don’t absorb water the way acrylic does.
The Real Prevention Strategy
Mold doesn’t grow on clean, dry surfaces. It needs moisture and time. A properly sized exhaust fan, consistent ventilation, sealed grout, and maintained caulk eliminate the conditions mold requires. You’re not preventing mold from landing on your grout — spores are everywhere, all the time. You’re preventing them from establishing themselves.
“`



Stay in the loop
Get the latest northwest renovate updates delivered to your inbox.