Why Your Fan Runs But Moves No Air
Bathroom exhaust fan troubleshooting has become tricky with all the conflicting advice flying around. As someone who spent three hours diagnosing a fan that turned out to be perfectly fine, I worked through the fundamentals of this particular headache. Today, I will share it all with you.
Here’s the short version: your fan hums, nothing moves, and you’ve already cleaned the grille. The problem almost always traces back to one of three things — a blocked or crushed duct between the fan and the outside world, a motor or capacitor that’s given up entirely, or an exterior damper flapper frozen shut by paint, debris, or winter moisture. That’s it. Three culprits.
The good news? You can diagnose most of this in under an hour. No special tools. The catch is knowing where to actually look — because half the time it’s not the fan at all. It’s three feet of kinked flex duct hiding in your attic, and you’d have spent $180 on a replacement fan for nothing.
Check the Duct Path First
Start in the attic. This is where bathroom exhaust systems quietly fall apart and nobody notices for years. Grab a flashlight — a decent one, not your phone — and trace the flex duct from the fan housing all the way to wherever it exits the building. You’re looking for three specific failure modes: crushing, kinking, and disconnection.
Crushed flex duct is shockingly common. The foil-and-wire construction that makes flex duct flexible also makes it fragile under weight. Someone blows in cellulose insulation without protecting the ductwork first, and suddenly your 4-inch duct is functioning more like a 1-inch duct. I found this exact problem at a rental in Portland — the duct was technically intact, technically connected, and completely useless. The insulation contractor had buried it without a second thought.
Check that the duct actually exits the house. Probably sounds obvious. It isn’t. I’ve personally seen situations where a previous owner routed the duct into the attic “temporarily” and just… left it there. The fan runs fine, exhausts warm moist air directly into the attic, and creates a slow-motion mold situation. A proper installation ends at a wall or roof vent cap with a damper flapper. If yours ends nowhere, that’s your whole problem right there.
If you find crushing, measure the damaged section. Less than two feet and still pliable? You might reshape it by hand and get away with it — at least if the foil hasn’t cracked. Anything longer or permanently deformed should get replaced. While you won’t need professional equipment, you will need a handful of things: new flex duct sized to match (usually 4-inch), metal foil tape — not regular duct tape, which fails within a year — and about ninety minutes of patience.
Test the Motor and Blower Wheel
Turn off the exhaust fan and bathroom light at the breaker. Wait five minutes. The capacitor needs time to discharge and skipping this step is genuinely dangerous. Remove the grille — most are held by friction tabs, though some older Broan and NuTone models use two small Phillips screws near the center. Inside, you’ll see the blower wheel: a small rimmed cylinder with curved blades, looks a bit like a hamster wheel.
Spin it by hand. Should rotate smoothly with mild resistance. If it catches, grinds, or refuses to move, lint has packed itself into the bearings. Grab an old toothbrush and clean around the wheel, the shaft, and the housing walls. This is the second-most common cause of dead airflow after duct problems — and it costs nothing to fix. Wipe the blades with a damp cloth, reinstall the grille, restore power, and test before doing anything else.
Now listen carefully when you turn it back on. If the motor hums but the wheel sits completely still — that’s a failed capacitor or a seized motor. Don’t try to manually spin the wheel while power is on. That’s how you destroy the motor entirely and turn a $25 repair into a full replacement. I’m apparently someone who learned this the hard way, and a replacement Panasonic FV-08VQ5 works for me now while the old Harbor Breeze unit never recovered.
Try the tissue test. Hold a single sheet of facial tissue about six inches from the grille with the fan running. Normal suction pulls it flat against the grille within one second. Weak suction barely flutters it. If the duct is clear, the wheel spins freely, and the tissue still hangs limp — the motor is weakening and replacement is your answer. Spare yourself the wrong turn I took of cleaning everything twice before accepting this conclusion.
Inspect the Exterior Damper Flapper
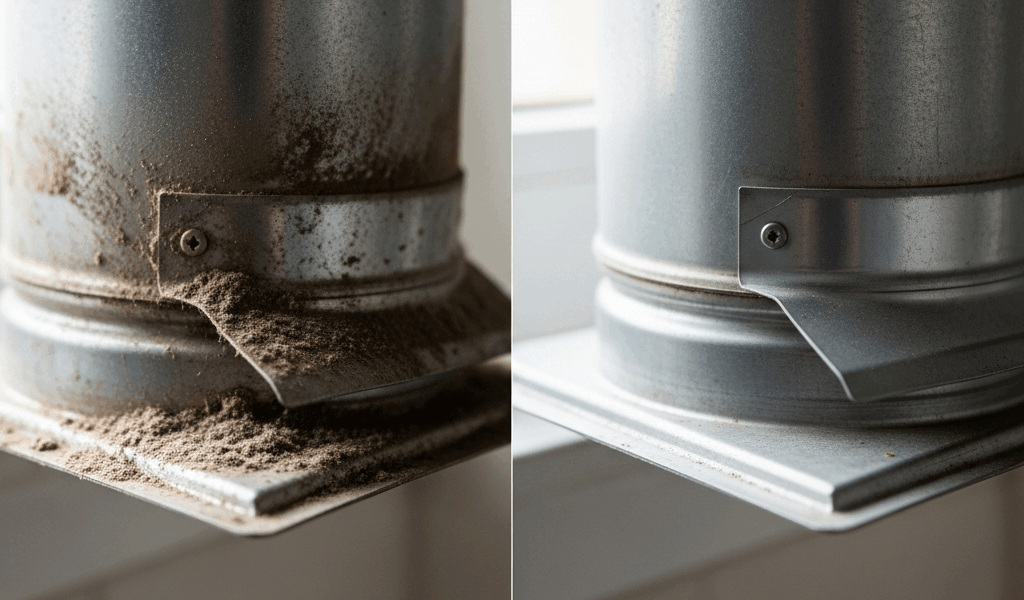
Here’s the part worth saying first. Most homeowners never check the outside vent cap in the entire time they own a home, which is why a stuck flapper catches people completely off guard. Head outside and find where your bathroom duct exits the building — typically a 4-inch or 6-inch round cap on the wall or roof. Look for the rectangular flapper door on the face of the cap.
Push it gently with one finger. It should swing open freely. If it doesn’t move, you’ve found your problem. But what is the actual cause? In essence, it’s usually one of three things: paint sealing the edges shut, debris jamming the hinge, or ice in colder climates. But it’s much more than that — in older homes, you sometimes find all three simultaneously. In my experience with Willamette Valley houses built before 1985, I’ve pulled flappers that were essentially painted shut, corroded, and held together mostly by accumulated pine needle debris. That’s what makes bathroom ventilation so endearing to us DIY homeowners — there’s always something new waiting.
Try opening it by hand first. Use a plastic scraper if paint is the issue — not a knife, which can damage the cap flange and create a water infiltration point. Spray WD-40 on the hinge and work it slowly. If it frees up and swings smoothly, you’re probably done. Just confirm the flapper closes flush against the weatherstrip around the opening. If it’s cracked, corroded, or won’t budge after ten minutes of reasonable effort, replace the cap. They run fifteen to forty dollars depending on duct diameter — that was the price in 2023 and it hasn’t changed much.
When to Replace the Fan vs. Fix It
So, without further ado, let’s dive in to the actual decision. Here’s your breakdown. Write it down if you need to.
- Duct is crushed and the fan is over ten years old: Replace both the duct section and the fan together. Fixing one and leaving the other is false economy — you’ll be back in the attic within two years.
- Motor hums, wheel won’t spin: Replace the fan. The capacitor or motor is finished. A replacement Broan 688 runs about $28 at most hardware stores and installs in two hours.
- Flapper was stuck and you freed it: Do the tissue test and call it done. That’s probably the whole fix.
- Wheel was caked with lint and spins after cleaning: Reinstall, test, move on with your Saturday. This solves it most of the time.
- Airflow is weak even after clearing the duct and cleaning the wheel: The fan might be undersized for your bathroom. A 50-square-foot bathroom needs at minimum a 50 CFM fan — 75 CFM is genuinely better. If your fan is twenty years old and rated 30 CFM, upgrading to something sized correctly will feel like a completely different bathroom. The Panasonic FV-11VQ5 at 110 CFM is overkill for most spaces but quiet enough that you’ll actually remember to run it.
Most of this takes a Saturday morning. A duct replacement in the attic might stretch to three hours if you’re running new flex duct and sealing joints properly with foil tape. A fan swap is usually two hours — at least if you’re comfortable with basic wiring and don’t mind tight spaces. If none of this matches what you’re seeing, or the attic access is genuinely inaccessible, call an HVAC tech. A hundred dollars in diagnostic labor beats replacing things randomly until something works.
Stay in the loop
Get the latest northwest renovate updates delivered to your inbox.