Why This Happens and What You Risk Leaving It
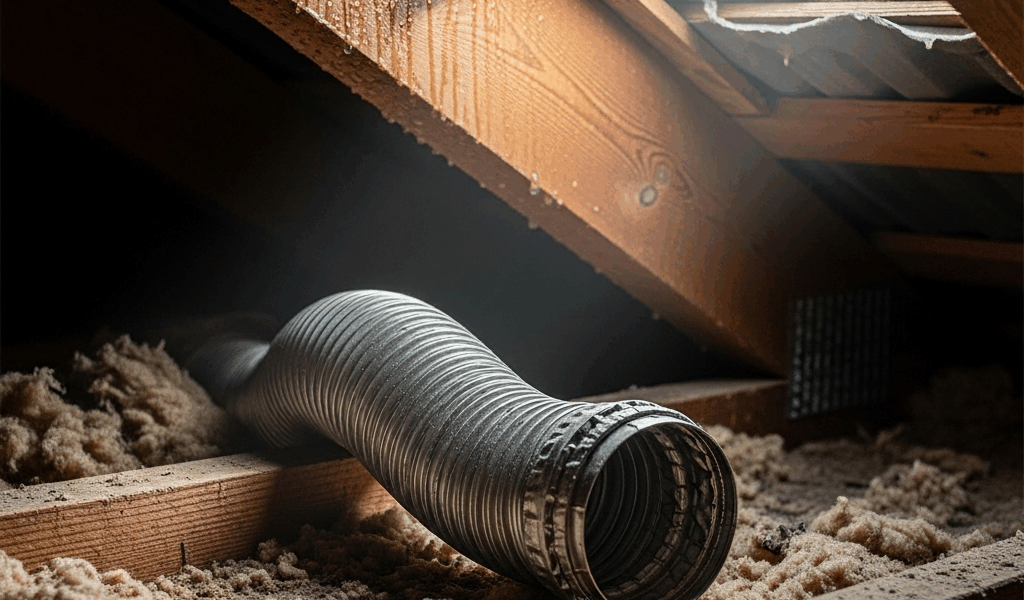
Bathroom ventilation has turned into a moving target with all the bad DIY advice flying around. A disconnected vent hose in the attic almost always comes down to one of two things. Either the flex duct was never clamped during installation — a shortcut I’ve personally seen more times than I care to count — or years of vibration gradually worked a kinked duct loose from the collar. Sometimes both. The collar where the duct slides onto the fan housing is smooth metal. Without a clamp or foil tape holding it, gravity and air pressure won’t keep it seated. They just won’t.
Here’s the real problem. Warm, moisture-laden shower air vents directly into your attic instead of outside. That humid air hits cold framing and condenses. Insulation gets saturated. Mold finds a home. Wet insulation loses its R-value fast, and wood rot follows eventually. You’ll spend thousands on structural repairs that a $3 clamp and twenty minutes in an attic could have prevented entirely. Steer clear of where I went wrong — I ignored a musty smell near my fan grille for two winters before I found the disconnected duct.
How to Tell the Duct Is Disconnected Without Going Up
Before climbing into the attic, confirm the diagnosis from the bathroom itself. Run the fan and listen. It’ll sound totally normal — that’s actually important to understand. A disconnected duct doesn’t change the fan noise because the fan is functioning fine. The problem is purely where the air travels after that point.
Look for these signs instead:
- Ceiling stays foggy or damp even 20 minutes after the fan has been running
- Musty, stale smell near the fan grille — not outside air, but something trapped indoors
- Drywall staining or slight discoloration above or around the fan trim ring
- Visible gaps around the fan grille edges when you look straight up at it
Cold, wet ceiling to the touch in winter? That’s attic moisture condensing and working downward through the drywall. The attic itself is the real clue here. Go look. That’s step one, honestly.
What You Need Before You Go Into the Attic
Here’s the part worth saying first. Attic work is straightforward — at least if you respect the space and show up prepared.
Grab these items first:
- Aluminum foil tape — not standard silver duct tape. Foil tape actually seals properly. Home Depot carries 3M and Nashua brand for around $8 a roll. Buy two rolls.
- Duct clamp or heavy-duty zip ties — a proper duct clamp runs about $6 and is worth every penny. Zip ties work but are harder to tighten evenly around a round duct. Grab 10 if you go that route.
- Headlamp or flashlight — hands-free light is non-negotiable up there. A $15 LED headlamp from Amazon beats holding a phone in your teeth by a wide margin.
- Knee boards or plywood scraps — step only on joists or solid wood. Never trust drywall to hold your weight. Even 2×8 scraps laid across joists give you safe, stable footing.
- Gloves — attic insulation is itchy. Old insulation can contain fiberglass particles you don’t want on your skin.
One safety check before you go up: measure your attic access opening. Tighter than 20 inches square and you won’t fit while carrying materials. Stage your supplies in the attic first if that’s the situation you’re working with.
Step-by-Step How to Reconnect the Vent Hose
Once you’re up there, the actual work is simple. Six steps. Stay organized and you won’t leave anything undone.
- Locate the fan housing. It’s a rectangular metal box — usually has insulation piled around it. The flex duct exits from the top or side. If it’s disconnected, you’ll see it sitting nearby or hanging partway off the collar. The collar is the metal ring it should be seated on.
- Inspect the flex duct for damage. Run your hands along the full length. Tears, crushed sections, kinks that won’t straighten — these matter. A small tear gets patched with foil tape. A collapsed section means the duct needs replacing entirely. A kink that straightens out fine is okay to reuse.
- Slide the flex duct back onto the fan collar. Overlap at least 2 inches — I personally go 3 inches for extra grip. The duct is slightly springy so it seats onto the collar pretty easily. Make sure it’s not twisted as it slides on.
- Secure it with a clamp or zip ties. If you’re using a duct clamp, tighten it snug without crushing the flex duct. Two heavy-duty zip ties cinched at opposite points work almost as well. Tug the duct hard after securing. It should not budge at all.
- Wrap the joint with aluminum foil tape. Start at one end of the overlap zone and spiral the tape around the connection. Two full wraps minimum. Press it down firmly so it actually seals against air leakage and stops moisture from condensing right at the joint.
- Check the far end of the duct. Follow the duct to where it exits — usually a roof cap or soffit vent. Confirm it’s still connected and not kinked sharply anywhere along the run. A sharp bend can collapse the duct over time or create enough negative pressure to pull the upstream end loose again. Straighten what you can or reroute slightly if needed.
After the Fix, Check This Before You Leave the Attic
You’re not done yet. Go back downstairs and run the fan for about a minute. Then return to the attic and hold your hand near the connection joint. You should feel warm, moving air — at least if the fix took properly. Feel nothing? Something’s still disconnected or the duct is blocked downstream. Trace the entire line and find it before you leave.
While you’re up there, check the insulation around the duct run. If it’s been shoved aside or compressed, push it back. Disturbed insulation doesn’t insulate — that’s just physics. If any insulation feels wet or smells musty, you’ve already got moisture damage sitting in there. A moisture meter from Harbor Freight — usually $25 to $40 — will tell you if wood framing is absorbing water. Readings above 15% mean something more serious needs attention, possibly a broader humidity or ventilation problem elsewhere in the attic.
I’m apparently someone who skips the follow-up inspection, and ignoring that step works for overconfident people while actually catching problems never happens that way. One last thing worth doing: after the first hard freeze of the season, climb back up and spot-check your work. Cold weather reveals small leaks and connection issues that mild weather hides completely. The trip takes ten minutes. Peace of mind is worth it.


Stay in the loop
Get the latest northwest renovate updates delivered to your inbox.