“`html
Is It Actually Black Grout or Mold Buildup
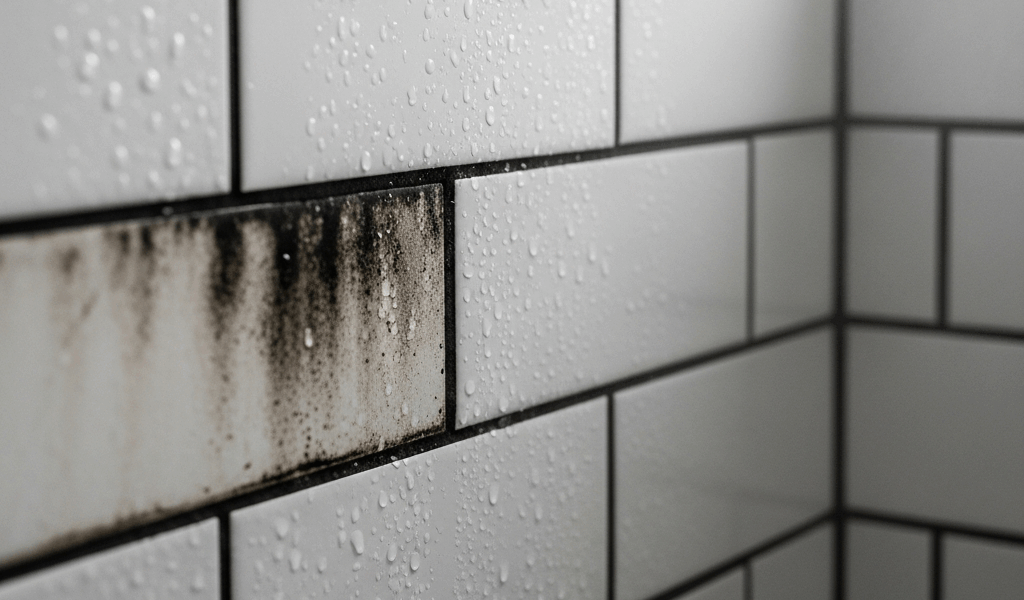
Three years. That’s how long I stared at my master bathroom shower convinced the grout was just permanently dark—some design choice I’d made and regretted. Turns out I was looking at mold the entire time, and apparently I’m not alone in missing it. Black grout staining in showers has gotten complicated with all the “it’s just the color” assumptions flying around. Here’s what nobody tells you upfront: that black discoloration? It’s almost always mold or mildew settled deep into the porous grout lines. Actual dark grout is rare.
The distinction matters because the fix changes completely. True black grout—the intentional kind you order—stays black no matter how hard you scrub. Mold-covered grout can be restored. Let me walk you through the diagnostic.
Start with the vinegar test. Pour white vinegar directly onto the blackened grout lines and wait 10 minutes. Standard white vinegar runs about $3 per gallon at any grocery store. If the black areas lighten or disappear, you’re dealing with mold or mildew. If nothing changes, mineral deposits from hard water or actual dark grout that was sealed poorly—that’s your culprit instead.
Why are showers basically mold factories? Three factors converge and never leave. Moisture is constant. Darkness is built-in — shower corners never catch direct sunlight. Soap residue feeds the growth. Mold loves all three simultaneously, and your grout lines create perfect colonies for it.
The vinegar reaction happens because acetic acid disrupts mold cell walls. Mineral deposits don’t respond. If you tested and nothing shifted, you’re dealing with something different — one that requires different cleaning chemistry entirely.
Deep Clean Black Shower Grout in 3 Steps
Probably should have opened with this section, honestly. Once you know what you’re fighting, the actual cleaning method is straightforward.
Step 1: Baking Soda and Hydrogen Peroxide Scrub
Mix baking soda (roughly $1.50 per pound) with 3% household hydrogen peroxide until you get a thick paste — about 3 parts baking soda to 1 part peroxide. Spread this directly onto the black grout lines. Let it sit for 5 minutes, then scrub aggressively using a grout brush or old toothbrush. You need friction here. Spend at least 15 minutes on a standard shower — longer if the staining is heavy.
This handles light to moderate mold. The hydrogen peroxide oxidizes the fungal cell structure while baking soda provides the abrasive action. Rinse thoroughly with hot water when finished.
Step 2: Bleach or Vinegar Spray
Timing becomes critical here. Using bleach — 5.25% sodium hypochlorite, the standard household version — spray the grout lines and let it sit for exactly 10 minutes. No longer than that. Extended bleach contact can weaken grout structure over time. After 10 minutes, scrub lightly and rinse with abundant water.
Prefer vinegar instead? Spray and let it sit for 20 minutes. Vinegar is gentler on the grout but less aggressive on stubborn mold. Choose based on severity. Expect a 2- to 3-hour time investment for a full shower — not including drying time.
Never mix bleach and ammonia. This creates chlorine gas, which is immediately dangerous. Period.
The most common mistake I see people make is using water-based cleaners only. Those fancy tile sprays at $8-12 per bottle won’t work — they wonder why the mold returns in a week. Water doesn’t kill mold. It feeds it. You need either oxidizing action (bleach or hydrogen peroxide) or acidic action (vinegar) to actually disrupt the fungal structure.
Step 3: Seal or Prevent Regrowth
Once the grout is clean and completely dry — wait 48 hours minimum — apply a grout sealer. Penetrating sealers cost $15-40 and last 1-3 years depending on bathroom humidity. Brush or spray it directly into the grout lines. This fills the pores and makes it harder for mold to establish itself again.
If your grout is original and you’re unsure whether it’s sealed, assume it isn’t. Most builders skip sealing to save money on new construction.
When Black Grout Comes Back Immediately
Frustrated by returning black spots just two weeks after deep cleaning, I realized my exhaust fan was running maybe twice a week when it should have been running during and 30 minutes after every shower. That’s when you find out whether you have a cleaning problem or a ventilation problem.
Recurring mold indicates one of three failures: inadequate ventilation, water intrusion from outside the shower enclosure, or substandard original grout sealing that no amount of cleaning fixes.
Ventilation failure is the most common culprit. Bathroom humidity should stay below 60%. If your exhaust fan isn’t rated for your bathroom size — measure length × width × height in feet, then multiply by 8 — it’s undersized. A 5×8×8 bathroom (320 cubic feet) needs a 2,560 CFM-hour rating. Most builder-grade fans are 50-80 CFM, which is genuinely inadequate.
Upgrading costs $200-400 for professional installation of a proper fan with humidity sensors. It’s the difference between solving the problem forever and cleaning every three weeks indefinitely. If mold returns within 14 days despite proper cleaning, the ventilation is almost certainly your limiting factor.
Water intrusion is sneakier. Cracked grout lines or missing caulk between the shower surround and wall means water penetrates behind the tile. Mold grows in those hidden spaces and surfaces as black discoloration on the grout you can see. Silicone caulk reapplication costs $50-150 if you do it yourself or $200-300 professionally.
Black Grout Prevention After Cleaning
After you’ve deep-cleaned, specific daily habits determine whether mold returns in a month or a year. This is where most homeowners fail because the tactics are tedious.
Use a squeegee after every shower. Wipe down walls and floor. This removes standing water where mold colonies would begin. A basic squeegee costs $8-15. Do this immediately after showering — not later that day.
Run your exhaust fan during the shower and for at least 30 minutes after. Set a timer on your phone initially. This evacuates moisture instead of trapping it in the grout.
Reapply grout sealer yearly if you used a standard penetrating sealer. Mark your calendar. March or September works for most people. Upgraded to epoxy grout? Resealing is needed every three years instead.
Maintain bathroom humidity below 60%. Run a bathroom exhaust fan continuously during winter if humidity climbs above that threshold. You can buy a $20 humidity monitor at any hardware store.
These aren’t generic suggestions. They’re the specific actions that determine whether your cleaned grout stays clean or becomes a mold farm again.
Professional Grout Replacement vs. Cleaning
Sometimes cleaning isn’t the answer. If your grout is crumbling, if mold persists despite upgrading ventilation and sealing, or if you simply prefer not to manage recurrence, professional grout replacement is the permanent solution.
A professional cleaning costs $150-300 depending on shower size and mold severity. A complete regrout runs $500-1,500 depending on tile size, grout type, and whether structural repair is needed.
Standard cement-based grout ($3-5 per pound) requires sealing and shows mold again within 2-3 years if ventilation isn’t perfect. Epoxy grout ($8-12 per pound, plus higher labor) lasts 10+ years and resists mold significantly better because it’s non-porous. Epoxy grout costs 2-3 times more upfront but essentially eliminates recurring mold problems if ventilation is adequate.
The decision logic is straightforward: if your shower mold returns every season despite sealing, epoxy grout pays for itself in reduced cleaning labor and eliminated frustration within three years. If you clean once a year and it stays clean, standard grout with yearly sealing is fine.
Black grout staining is solvable. Start with the vinegar test. Clean aggressively using the three-step method. Fix the ventilation if mold returns quickly. Only then consider professional replacement. Most homeowners skip the ventilation diagnosis and repeat the cleaning cycle endlessly. Don’t make my mistake.
“`



Stay in the loop
Get the latest northwest renovate updates delivered to your inbox.