Where Kitchen Faucet Leaks Usually Start
A kitchen faucet leaking under sink—it looks way scarier than it actually is. I’ve fixed maybe fifteen of these in my own rentals and friends’ places, and honestly, ninety percent of the time the problem isn’t hiding deep inside some mysterious cartridge. It’s one of three spots you can pinpoint in about ten minutes with just a flashlight.
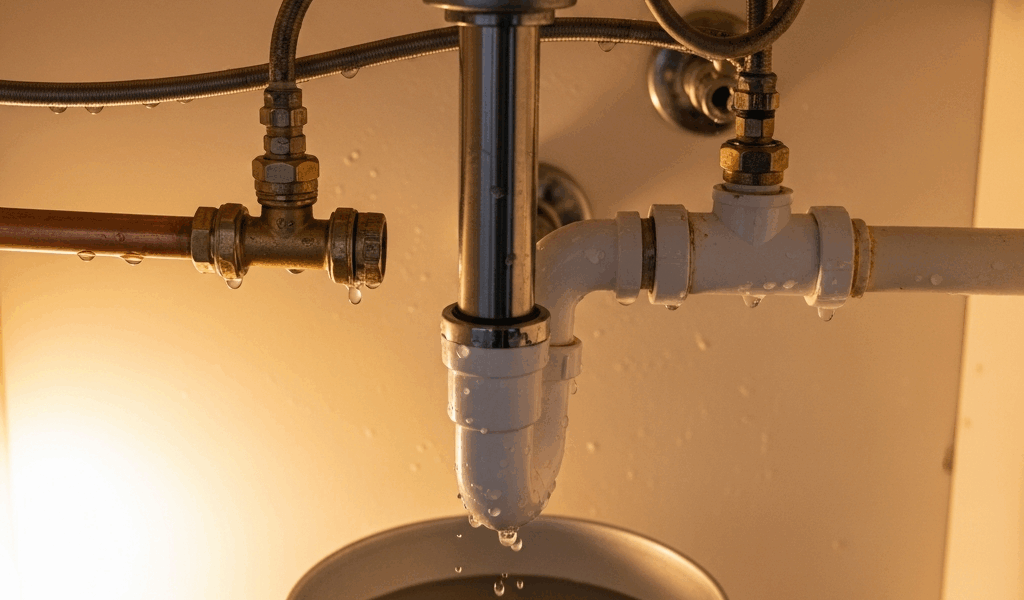
Your supply lines are suspect number one. These are the flexible hoses—usually braided metal or rubber—that feed water from the shutoff valves to your faucet. They screw onto compression fittings with hexagonal nuts. Grab your flashlight, get under the sink, and trace the lines from the wall shutoff valves upward to where they connect at the faucet base. Water pooling right at those connection points? That’s your culprit.
Second problem: compression fittings themselves. Small chrome cylinders sitting below the sink, connecting the supply lines to the faucet. Hex nuts you can turn by hand or with a wrench. When these loosen—vibration, temperature changes, water pressure doing its thing—water seeps out around the threads. It happens constantly.
The third spot is trickier: O-rings and seals inside the faucet body. Turn the water on and watch whether water drips from the spout when it’s supposed to be off. Handles turned all the way off but still dripping? The rubber seals inside have worn out. I learned this the hard way after ignoring a dripping kitchen faucet for three months—the water bill spike was genuinely shocking. Should have fixed it earlier.
How to Diagnose a Leak Before You Repair
Smart diagnosis saves you from tearing into the faucet when the real problem is just a loose fitting. Here’s my process every single time.
Turn off the main water supply or use the shutoff valves under the sink. Open the faucet to release pressure. Let it sit for one minute. Now dry the entire underside of the sink—cabinet bottom, pipes, fitting connections—with a clean towel. Wipe it thoroughly. Don’t leave any moisture behind.
Turn the water back on. Let it run at normal pressure for thirty seconds. Turn it off. Wait five minutes without touching anything.
Flashlight time. Check where water appears first. Pooling at a connection point where two pieces screw together? Supply line or compression fitting issue. Water dripping from the faucet spout even though the handle is fully off? Internal seal problem. Water coming from under the faucet base itself, spreading across the counter deck or sink rim? That suggests damage inside the faucet body or a damaged deck gasket.
Also note whether the leak is constant or only happens under pressure. If it only leaks when water is actively running, you’ve got a worn seal inside the faucet. If it continues dripping for hours after you turn the water off—that’s a loose compression fitting.
Fix Loose Supply Line Connections
This is the most common fix and usually takes five minutes. Probably should have opened with this section, honestly—most people panic about faucet leaks when ninety percent of the time they just need to tighten one fitting.
You’ll need an adjustable wrench and a towel. Place the towel under the leak area to catch any residual water. Locate the hexagonal nut where the supply line screws into the faucet body. Usually chrome, about the size of a dime, sits at the base of your faucet under the sink.
Grip the nut firmly with your adjustable wrench and turn it clockwise about a quarter turn. Don’t muscle it. Compression fittings seal with gentle pressure, not brute force. I made the mistake of over-tightening a plastic fitting once and cracked it—actually made the leak worse and cost me a hundred dollars in supply line replacement. Don’t make my mistake.
Turn the water back on and observe the connection. Water stops dripping? You’re done. Still leaking? Try another quarter turn. Stop at three-quarter turn total. If it’s still leaking after that, the fitting itself is probably damaged and you’ll need to replace the supply line.
Critical detail: use a second wrench to hold the body of the fitting steady while you turn the nut. If you only turn the nut without bracing the fitting, you rotate the internal compression sleeve and destroy the seal. Look for where the supply line disappears into the fitting—that’s the body. Use a small wrench or hex key to hold it in place.
Replace O-Rings and Seals Inside the Faucet
If tightening didn’t work and water drips from the spout or pools at the faucet base, you’re dealing with worn seals. This repair is doable—requires some patience and attention to detail, that’s all.
Turn off the water at the shutoff valves under the sink. Turn the faucet on to release residual pressure. Grab a Phillips screwdriver, an adjustable wrench, and a replacement O-ring or seal kit. Faucet manufacturers usually sell kits specific to your model for ten to twenty dollars. Find your faucet model number—it’s often stamped inside the cabinet or on the faucet body itself—and search “[brand] [model] seal kit” online.
Most kitchen faucets have a handle screw hidden under a decorative cap. Pop off that cap with your screwdriver and remove the screw beneath it. The handle lifts straight off. Under the handle is a dome cap or decorative collar—use your wrench to turn this counterclockwise and remove it. Under that sits the actual cartridge or valve body, which contains the worn seals.
The cartridge itself pulls straight up. You may need to wiggle it slightly. Once it’s out, you’ll see rubber O-rings or washers around its body. These are what’s usually worn. Peel off the old rubber pieces—they’ll be hard and cracked—and slide on the new ones from your seal kit. Make sure they seat properly in their grooves.
Reinstall the cartridge by pushing it down firmly until it’s flush. Reinstall the dome cap, the handle, and the decorative cap. Turn the water back on and test the faucet. Still dripping? You may have reversed the cartridge (some models have orientation) or the seat inside the faucet body is damaged.
When to Replace the Faucet Instead of Repair
I’ll be honest about when repair stops making economic sense. Your faucet is over ten years old, repair parts cost more than fifty dollars, and water is pooling in multiple locations? Replacement is probably smarter than nursing along a dying fixture.
Here’s the math I use. A basic kitchen faucet runs fifty to one hundred twenty dollars. Installation takes an hour if you’re doing it yourself—slightly longer if you have an old faucet with hardened connections that need cutting out. Repair parts—seal kits, supply lines, compression fittings—usually run eight to thirty dollars. But if your cartridge is damaged, or if you discover the faucet body has corrosion, you’re looking at forty to eighty dollars just for parts, plus your time diagnosing and installing them.
Second consideration: is this the original faucet in a house you just bought? Or have you already repaired it twice in the past two years? Second scenario means the internal components have worn out unevenly. Another repair will probably only buy you six months.
Third thing I check: can you find replacement parts for your specific model? Some manufacturers discontinued models years ago. If you need a cartridge and can’t find one anywhere, replacement is your only option. I once spent two hours searching for a seal kit for a Moen model from 2005—it didn’t exist online. Had to replace the whole faucet.
Your faucet is less than eight years old and this is your first leak? Repair it. Older than that, multiple leak points, or parts are expensive or unavailable? Replacement is the smarter move. Most modern kitchen faucets are designed to last ten to fifteen years with normal use. You’re not giving up early by replacing one that’s past its life expectancy.

Stay in the loop
Get the latest northwest renovate updates delivered to your inbox.