“`html
How to Identify Water Damaged Drywall You Can’t See
I learned about drywall water damage repair before mold spreads the hard way — after a frozen pipe burst behind my master bedroom wall in January. The first thing I noticed wasn’t catastrophic. It was subtle. A faint discoloration near the baseboard, almost like someone had spilled coffee and wiped it away. By the time I realized what I was looking at, the damage extended nearly eight feet along the wall.
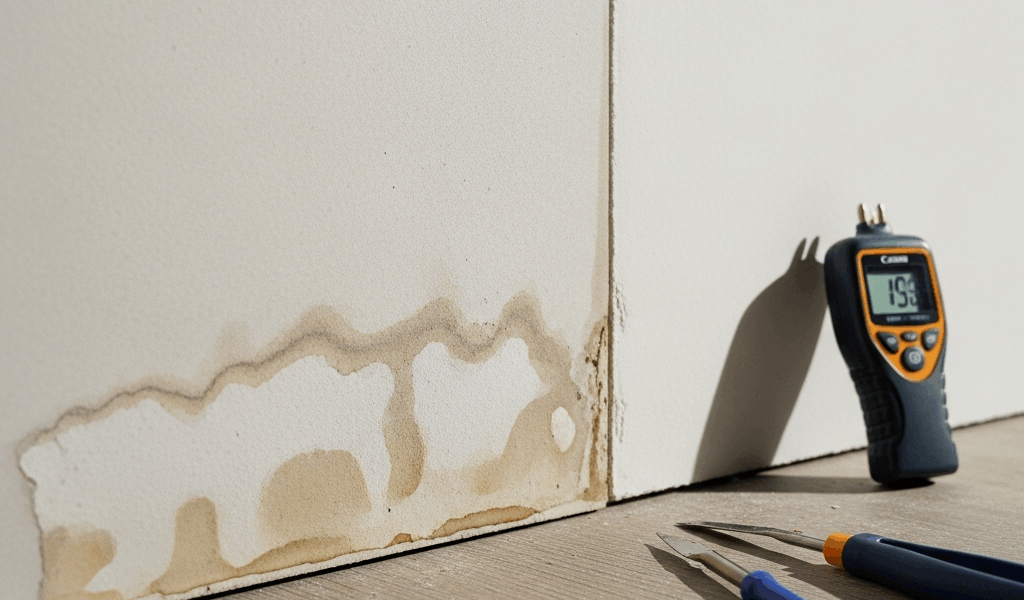
Here’s what actually matters when you’re hunting for hidden water damage. Visual discoloration shows up first — usually as a brownish, rust-colored stain or a dark shadow spreading across the drywall surface. But that’s only the beginning. The real problem lives behind the paint and paper.
Press your finger against the wall. A firm, normal drywall surface resists pressure. Water-damaged drywall feels soft, almost spongy — it might feel cool to the touch even days after the water source stops. In the Pacific Northwest, where humidity stays elevated year-round, this softness becomes your primary diagnostic tool. I’ve found that damaged sections often feel noticeably different from surrounding areas. Think pressing into a water-logged sponge versus cardboard.
Smell is your second indicator. Fresh water damage smells earthy, musty. If you catch it within the first 24 to 48 hours, the odor is faint but present. Stale water damage or developing mold smells distinctly foul — almost like wet basement meets decomposing wood. Trust your nose here. It’s detecting microbial activity before your eyes can see it.
Sagging drywall means the moisture has already compromised the gypsum core’s structural integrity. The paper facing tears easily. The surface might bubble or blister. This isn’t something to patch. This requires full section replacement — no shortcuts.
Moisture meters changed everything for me. I grabbed an Extech MO220 (around $40 on Amazon) after the pipe incident. These handheld devices measure moisture content in wood and drywall. Normal drywall reads 6 to 12 percent moisture. Anything above 15 percent means you’ve got active water saturation. Readings above 20 percent signal the timeline for mold colonization is accelerating. In Seattle’s climate, I now take meter readings every 12 hours during the drying phase. The data prevents guessing.
Safety First: When to Stop and Call a Pro
Probably should have opened with this section, honestly. Water damage assessment requires you to pause before touching anything.
Electrical hazards come first. If water has reached outlets, switch plates, or the wiring behind the wall, stop immediately. Call a licensed electrician before proceeding. Wet walls conduct electricity. I know someone who got a serious shock reaching toward a seemingly “dry” outlet two days after water exposure. The wall looked fine. The wiring wasn’t.
Look for visible mold growth — black, green, or fuzzy spots colonizing the drywall or framing. Mold colonies visible to the naked eye mean spore counts are already dangerous. This requires professional remediation, not DIY scrubbing. If you see mold, seal the area, turn off HVAC systems that might spread spores, and call a mold remediation specialist immediately.
Load-bearing studs matter too. If the water damage affects vertical framing in exterior walls or interior support walls, structural integrity is at risk. You’ll see this if the studs feel soft or show visible rot. Professional assessment becomes mandatory. Sagging ceilings indicate joist damage. Don’t ignore this.
Large damage areas — anything exceeding roughly 100 square feet — typically exceed typical DIY scope. Insurance companies often require professional documentation and repair for significant losses anyway.
Step-by-Step Drywall Removal and Prep
I cut high. Much higher than the visible water line seemed to require. This decision saved me from repeating the work months later.
Here’s your tool checklist: utility knife with fresh blades (I use Stanley 10-packs, $8), pry bar or drywall removal tool ($15), drywall saw ($12), measuring tape, and a Shop-Vac with HEPA filter ($80 to $150). You’ll also need a moisture meter if you don’t have one already.
Before cutting anything, take moisture readings across the wall. Mark the areas where moisture exceeds 15 percent. Now measure 12 inches above the highest wet reading. This is your cut line. Why? Water wicks upward through paper facing and gypsum. Visible saturation is never the actual boundary.
Score a horizontal line at your cut mark using the utility knife and a straightedge. Make several passes until you’ve cut through the paper facing. Do the same vertically, creating a rectangle around the damaged section. For the vertical cuts, extend them to the center of the nearest studs on either side — typically 16 inches apart.
Use the pry bar to break the gypsum core and separate the paper facing. A drywall saw works better for detailed cuts. The damaged section should pull away from the studs with moderate effort. If it’s stuck, the wall is still too wet. Wait another 24 hours before attempting removal.
Inspect the exposed studs. They should be firm and light-colored. Soft studs or dark discoloration means wood rot has begun. Stop here and call a contractor. For normal circumstances, once the section is removed, use your utility knife to trim any loose paper facing from the edges. Clean up debris into heavy-duty bags. Don’t let wet drywall pieces sit in your garage — mold colonizes quickly in enclosed spaces.
Drying the Wall Cavity Before Repair
This phase determines whether mold grows. I learned this through expensive failure the first time.
Position a dehumidifier directly facing the open wall cavity. Point a box fan across the opening to push air circulation across the studs. In Pacific Northwest winter conditions (35 to 50 degrees Fahrenheit), drying takes 3 to 7 days. Summer speeds it to 2 to 3 days. Humidity should drop from the initial 80 to 95 percent range down below 60 percent within the first 24 hours if your setup works.
Place the moisture meter against the exposed studs every 12 hours. You’re targeting readings below 12 to 15 percent. The studs are typically 1.5 inches thick, so meter probes should penetrate about three-quarters of the way through to get accurate readings of the inner wood. I found that studs near external walls in the PNW dry slower than interior locations — sometimes taking twice as long.
Don’t use temporary vapor barriers yet. Air needs to move across the studs. Vapor barriers trap moisture. Once studs read consistently below 15 percent, then you can install a vapor barrier behind the patch. Smart Barrier or Zipwall products ($20 to $40 per 100 square feet) work well.
Temperature matters. Cold walls dry slower. If it’s winter and you’re dealing with an exterior wall, consider running a space heater near (not inside) the wall cavity. Heat accelerates evaporation. I kept my crawlspace at 65 degrees Fahrenheit while running a dehumidifier on my burst-pipe wall, reducing drying time from six days to three.
Patching and Finishing Your Drywall Repair
Once moisture readings confirm the studs are dry, you’re ready to patch.
Cut a new drywall piece to fit the opening. Standard drywall sheets work fine for most repairs — grab half-inch thickness to match existing walls. Secure it to the studs with 1.25-inch drywall screws (GRK or Spax brands, $8 per box), spacing them 12 inches apart. Three screws per stud minimum.
Now the finish work begins. Use joint compound (DAP Fast ‘N Final or USG Sheetrock, both $12 to $15 per bucket) to tape seams. Apply mesh drywall tape first, then compound over it. First coat: thin layer, just enough to embed the tape. Sand smooth once dry (usually 24 hours). Second coat: fill imperfections. Third coat: final smoothing. Three coats is standard. Some finishers can do it in two if they’re experienced. I typically need three.
Prime with a moisture-resistant primer — Kilz 2 or Zinsser are solid choices ($15 to $20 per gallon). Standard primers don’t protect against future moisture events. This is where I cut corners on my first repair and regretted it.
Paint with semi-gloss or satin finish (better moisture resistance than flat paint). Two coats minimum. Texture matching is optional but makes repairs invisible. If your existing wall has orange-peel or popcorn texture, you’ll either need to match it or accept that the patch will look different. Many PNW homes have smooth walls, which is forgiving.
If your seams don’t look perfect after your third coat, or if the texture doesn’t match, hiring a finishing specialist for $150 to $300 is worth it. A sloppy drywall finish broadcasts “water damage happened here” to anyone looking at your home.
Start monitoring the patched area immediately. Moisture readings should stay below 12 percent for two weeks. Any increase signals that either the underlying studs aren’t fully dry or new moisture is entering. Catch this early. Mold colonies don’t announce themselves visibly until they’re already thriving.
“`
Stay in the loop
Get the latest northwest renovate updates delivered to your inbox.